Sock monkey pants

>> Friday, November 12, 2010

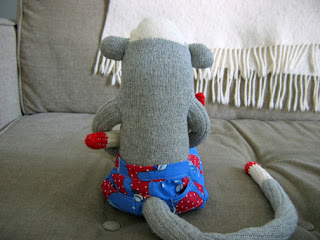
Have you ever wondered if sock monkeys get cranky? Well it's rare, but as you can see in this picture Francis has his arms crossed in a way that suggests he is annoyed about something. Here's what happened.
Francis modelled some pants for me so I could figure out the pattern to make some pants for a gift for someone else with a sock monkey. But I think there was a misunderstanding and he thought the pants were for him.

He has his arms crossed but as you can see he's still smiling because sock monkeys never really get cranky. It's just not in their nature. But I did think he should get his own pants. And of course Fifi needed pants too.
Francis picked out a red plaid for his new pants and Fifi picked a floral. They look a bit like jammy pants to me, but I wasn't going to argue because the heart wants what it wants.

Read more...

Wonky free motion quilting

>> Tuesday, November 02, 2010

This is my quilt folded, pretending it's finished
So as I was saying, we only had a handful of trick-or-treaters. Possibly Bradley's jack-o-lantern was too scary? I will have to alert him to this issue.

But now, onto the quilting. I finished my second quilt top a long time ago, the Denyse Schimdt Single Girl, but since basting it together, it has languished around being a big disappointment. This is because I made a few choices for it that I later regretted.
This is the hand-quilted part
First of all I used muslin for the background, and once it was finished it suddenly seemed a bit drab to me and I wasn't crazy about it. I had considered a white cotton initially but it seemed too bright next to some of the vintage prints. So there's that.

Then I also decided to experiment and used curtain interlining for the batting. It's sort of soft and fuzzy and thinner than the other batting I've used so I thought it would be easier to do nice fine hand-quilting. Plus it was an inexpensive option. But once it was all pin-basted together the lining seemed to make the whole quilt sort of heavy and droopy. So there's that.

Then I decided that I would hand quilt it. As I expected with the thin "batting" I could do nice tiny stitches. I used the circle design suggested by the pattern. But once I had finished three rows I wasn't thrilled. It just didn't seem quilted enough, there were large areas that I felt would need lots more quilting. Which would take ages. Especially as I wasn't motivated to finish it since I didn't love my quilt anymore.
So enough complaining, because.. I've sorted it all out! I decided that I would cut my losses and switch to machine quilting. I decided on free-motion quilting because I have a darning foot already for my Bernina, and I don't have a walking foot yet. Plus I wanted to try free-motion. And I love it! I love the way it looks, I love the way it feels and I like the muslin now. Even the interlining seems right now, it's a thin quilt (which was the original plan, I like thin quilts) but with a nice textured feel. And it's so pretty!
Detail of the machine quilting
I did a very simple scribbled loop pattern, just the same loop over and over, one column at a time. It seemed like an easy way to start and I like the design. There are lots of mistakes but you'd really have to examine the quilt to spot them, so I just don't care. Which isn't like me at all. I may do more hand quilting someday, but somehow for this quilt, machine quilting has been the answer. It does mean I will have to undo lots of hand quilting.. yuck.. but I really think it's worth it.

Read more...

Happy Halloween!

>> Sunday, October 31, 2010

Bradley outdid himself this year, with a very simple but spooky jack-o-lantern!
I think the secret was spending more time on the sketch phase. Then he whipped it up in no time! We're ready for the trick-or-treaters now.
Update: we have had hardly any trick-or treaters. I have been FORCED to eat a bunch of candy myself.

Read more...

Zippered wristlets!

>> Monday, October 25, 2010

I've finally figured out how to adapt my wristlets to include a zipper. A couple of people have told me they wished my wristlets had zippers at craft shows and I thought it was a good idea too (see? I do listen to you!).
I just had to figure out how to add the zipper with the front flap there as well. I have a few ready now and I've started putting them in my shop. I love the pink and purple floral fabric on this one. Have a look!

Read more...

Yellow log cabin quilt

>> Thursday, October 14, 2010

I've been wanting to make a yellow quilt forever. So just in time for the rainy days we've been having, I've finally gathered up the yellow prints I had on hand. I've never sewn a log cabin quilt square before, but I've read online that it's addictive. Now that I've made my first one I can confirm that it's true! I decided to do my cutting freehand, just making strips as I went along and not worrying about having them all be the same width.

I like the result. At the end I will true up each square using a cardboard template and then when I join all the squares my quilt won't be too wonky! At the end when I have a stack of squares I can arrange them before joining them together and make sure the quilt is balanced. I'm not sure yet whether I'll add sashing (extra strips between the squares).

As usual I have hoarded tiny scraps of my favourite prints, so it's been very nice to finally be able to use even the smallest pieces. Things have been busy lately so this quilt could go very slowly, but I've decided I'd rather just do a square at a time, and not cut it all out beforehand, and maybe even not do any chain piecing. I've found it very relaxing to just choose and cut a piece at a time and put it all together.
This square went together very quickly so I think you could whip up a quilt top this way in no time. For the quilt back I think I'll just keep an eye out for a vintage sheet with some yellow. My quilt is going to be so cheerful!

Read more...

Elora Gorge hiking

>> Tuesday, September 21, 2010

Last weekend was our 4th anniversary so we decided to have a little outing and rent a car so we could head up north.
Saturday was mostly about driving around and exploring. We saw a truck fire on the way up north (!), had a delicious bruschetta/salad and cream tea at SerndipiTea in Midland, explored in the area and later ended up at a nice spot near Honey Harbour where we had a short walk. Then on the way back home we saw a moose! He was standing beside the road and we slowed down so that I could (of course) try and take a picture, but before I could he turned and headed back into the woods.
My favourite outing was Sunday when we visited Elora Gorge for hiking.
I took the usual photos of the gorge but I like to take close-up photos because they seem to capture the feel of a day for me.
The hiking around Alora Gorge is very woodsy so there's lots of picturesque moss on the trees and rocks.
At the end of the day we saw some incredible caves near the gorge at the water level but by then it was too dark to take pictures. So here's a picture taken earlier in the day to give you the general idea.
We also saw some rabbits.. all-in-all it was a nice busy weekend.

p.s. I just bought the needlebook.ca domain name. I wanted ".com" but the first time I looked it was $100 and I was like "meh". Then I checked again today and it was $1000! So ".ca" it is. I've rerouted it to my blog for now so you can type in "needlebook.ca" to visit my blog. Which is just a bit easier, right?

Read more...

New items in my shop!

>> Tuesday, September 07, 2010

There are lots of new things in my shop now...
I just needed to get started with updating it again. I had some new wristlets ready, particularly two in one of my favourite barkcloth prints, a painting by Grandma Moses. The bits I've picked are snowy woods, one of them with a little cottage:
 I had a navy blue floral sweethaven bag ready as well:
The blue needlebook is the last one of that batch and I'll make some new ones soon in a different set of colours:
And a special bonus just for my blog readers - buy any wristlet, bag or needle book from my shop and mention this blog in the comments and I will send a free bonus, one of my little deer print pincushions!
NOTE * Each pincushion is a little different, offer good for September 2010, while quantities last. *
 Thanks for looking!

Read more...

How to sew a pillow with piping, a zipper and a lining

>> Wednesday, September 01, 2010

So I was looking this up online and I could find pillow tutorials with a couple of these features but not all three. I took some time to figure it out and now I'm going to show you how I did it!

Just one note, I did it with 1. a regular zipper and 2. a regular zipper foot. It's also put together with materials I had already. So there are other ways to do it, such as with an invisible zipper, but in the end I was really happy with the results.
First of all, the fabric. I had a beautiful end piece of hand printed chintz that I found at the Textile Museum Sale. It's a gorgeous 1920s Scalamandre pictorial print called China Rose, and there was actually just enough to make two large covers, the same size as the existing cushions I had on the couch.

Here's my trick for cutting out matching cushions with a pictorial print. Arrange the two halves of fabric so that the print is aligned then cut out two matching front pieces and two matching back pieces. The front is different from the back on each pillow but the two pillows match. Just a nice little detail.

To make your piping cut narrow strips of fabric on the bias and use it to cover a length of cord. You can buy cord for piping by the yard at fabric stores. You can use ready-made bias tape to cover your cord, the same fabric as your cushion, or a contrasting solid or print fabric. I used an olive green that matched the leaves in the print.

Despite the fact that this is a very nice fabric, it was a little bit thin for pillows. This means that without a lining the pillow wouldn't have a nice smooth luxurious look that does justice to the fabric. So I cut out two more squares of sturdy white cotton fabric for the linings.
Now that you have all that prepared you're ready to put it together.
STEP 1. Using your zipper foot, attach the piping to the top side of the cushion. 
Snip 3 little cuts in the extra fabric of your piping so that you can bend it neatly at the corners.
When you get to the end, pull the cord from one side out of its fabric casing a little bit, and trim the cord at an angle.
Then open up the empty fabric casing and fold it over the other end of piping. It's hard to describe this but it makes a neat join without two thicknesses of cord overlapping.
Don't do it right at the corner like I did, it's more difficult if you're working your way around the bend at the same time. I wasn't thinking ahead!
STEP 2. Attach the zipper to the bottom of the cushion (with an overall pattern it doesn't matter which side you attach it to). Place the zipper face down and open next to the piping and sew it as closely as you can to the piping.
Close the zipper and sew it to the back of the cushion.

This is what you have at this stage, the cover has the piping and zipper attached:
At this point you can decide you've had enough and finish your cushion without a lining. Just open your zipper up, pin the cushion right sides together, sew the three sides and you're done! You can serge or pink the edges of the fabric so that they don't fray. If you don't have a serger and the fabric is really prone to fraying (such as a loosely woven wool) you can cover the edges with bias tape.

Otherwise if you'd like a lining carry on to STEP 3.
STEP 3. Attach the lining piece to the zipper. The zipper will be sandwiched between the lining and the outer fabric. Pin it in place then open up to see if it's right before you sew. When the lining pieces are attached there should be nicely finished sides on both sides of the zipper - no raw edges showing. Repeat for the second lining piece. At this point I like to finger press the fabric next to the zipper so it doesn't get snagged when the zipper is opening and closing.

This is how it should look:
So far you have only joined the lining on the zipper side.
STEP 4. Align the cushion cover so that the the outside pieces are facing each other, right sides together, and the lining pieces are facing each other as well. Pin all around carefully. Make sure the zipper is open!

STEP 5. Sew all the way around, but leave a 6" gap at the bottom of the lining. Remove the pins as you go.

STEP 6. Trim the corners, then turn the cover right side out. Hand or machine stitch the gap in the lining closed. Insert your pillow form and you're finished!

Read more...

Tour de Fleece - sort of

>> Thursday, July 29, 2010

In June we were watching the FIFA World Cup. Bradley was waking up early every morning to watch it before going to work. Then that was overlapped with the beginning of the Tour de France and he started watching that every morning. Now that it's over I kind of miss it. How likeable is Andy Schleck??

So I had heard about the Tour de Fleece but never participated. If you Google it you'll find lots of blogs with spinning posts. It's just like the Knitting Olympics but for spinning. You set yourself a spinning goal and spin while the Tour de France is on.

This year I unofficially joined up with the goal to finish up a few spinning projects. I had little bundles of spindles with partly spun roving stashed all over the house. So now I can show you some more of my finished yarn!

I've decided that with all the work I was doing spinning fine (and trying to be even) singles, I would try keeping more of my yarn as singles. I like having thinner yarn and more yardage. A single isn't as strong as plied yarn but depending on what you're making it can be fine. And they're so pretty!
The first skein I finished was a silvery grey corriedale that was part of my birthday present from Bradley. It's a nice fat skein, kept as a single ply with just a wash to set the twist. (When yarn is freshly spun the twist is still "active" so setting the twist means finishing the yarn so that it's ready to be knit or crocheted.)

I can't remember if I've explained how I set the twist, but all I do is wind the yarn onto a pair of purse handles and soak it for a while in warm water. I add a little bit of hand soap (Body Shop Satsuma) just so it smells nice. This also washes the yarn a bit extra in case the fleece wasn't perfectly clean beforehand. Then I rinse the wool, gently squeeze (not wring) out the excess water, whack the skein against the side of the sink - just a couple of times - then hang the yarn to dry. I put a light washcloth inside the loop of yarn so that it doesn't tangle and I find it helps absorb some of the water so that it dries faster. If the weather is nice I hang the skein in our backyard - a skein dried in the open air has a lovely fresh smell.
The second skein I finished was the Rusty Ship merino that I dyed myself. I had spun half of it already and it was sitting on a bobbin. I love how this one turned out. Keeping the singles makes the colours more distinct, with just a little subtle candy-caning (ie. two colours twisted together for a candy cane stripe effect).

Here's a detail:
Then lastly, I finished a nice rich brown Shetland from Lettuce Knit. I love Shetland, it's lovely to spin and the finished yarn is soft and cushiony.
It feels good to get some WIPs all finished. Also I like having some nice skeins ready for the fall when I'll start to feel like making some new winter knits.
But today was not all good, someone took a big bite out of our first homegrown tomato! Bradley planted peas, carrots and beets this year, and I planted some already started tomato plants from our local market and a herb garden. Everything seems really slow to grow, and we finally had one of the tomatos turn a little bit orange.. and just as I was thinking I should probably bring it in, there it was this morning with a big bite! Boo.

Read more...

Lacy camera case

>> Wednesday, July 28, 2010

I know I've been neglecting my blog when I find cobwebs on my camera tripod. Sorry to have been away so long! I had a tight illustration deadline that was keeping me busy and after a couple of weeks I tend to get out of the habit. As usual I can't show you the artwork until the project is published so I'll try to remember to show you later on.

Incidentally I've started getting a lot of "advertising" comments on my blog which means a comment that's really just a link to a business. Some of the businesses are.. um.. not family friendly.. and it can take ages to delete tons of these automated comments so I've had to add moderation to any comments on posts older than 2 weeks. This means that sometimes I don't see comments right away because the moderated comments only show up when I log in to write a new post. So sorry for delays answering any questions. I usually just reply on the same post where you left the comment/question so you can look for that, but you can also just email me directly, my email is there on the sidebar. Or include your email with the comment. As always comments are appreciated - it reminds me that people do actually read my blog!

So anyway, I was at a wedding with a friend recently who noticed my small handmade camera bag. I had made it years ago and it seems a little wonky to me, but she liked it and wanted me to make one for her. She has a typical bulky black leather/vinyl? bag and wanted a smaller one. It was good timing as lately she's been giving me lots of nice old sewing things, vintage transfer patterns, and bags of bias tape, trim, zippers and buttons, so it was a perfect chance to say thank you!

I love when people find old sewing things and ask me if I'd like them. "Are you sure you want this?" "If you don't want this stuff you can just give it to Goodwill.." I love that. They always seem surprised at how thrilled I am.
When I designed the camera bag for my friend I decide it was time to update my own and these are the results. It's a really nice thick soft wool that helps cushion the camera a bit. The colour didn't come out right in the photos and I can't seem to fix it. It's a bit more rich and warm.. Anyway I'm loving this teal blue lately. The floral print was actually a scrap from Jen Anisef leftover at one of the Workroom Trunk shows (thank you Jen!).
The inside is green seersucker. I like seersucker, there's something about it that makes me nostalgic, something comforting about the texture.

Then the outside is embellished with a bit of antique lace from the Sunday Market. I collect these things incessantly so I'm always happy when the right project comes along to use them. I just can't turn down a mason jar full of buttons or a bundle of vintage bias tape or lace.
The overall pattern is modelled on the wristlets I've been making lately with squared bottom corners. The wool is so thick that it was hard to sew with too many layers, so it worked out better having the lining fabric overlap the top to finish it. It kind of looks like a basket liner.

Anyway I now have a camera bag that I love!

Read more...

  © Blogger template Simple n' Sweet by Ourblogtemplates.com 2009

Back to TOP