Long wool fleece

>> Monday, November 30, 2009

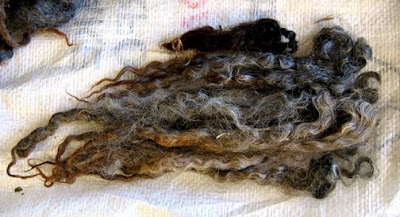
The locks all combed and ready to spin, just as soft as they look in the photo. A winter nest anyone?

As promised, here's a post about how I'm preparing the fleece I bought at the Royal Winter Fair. This is the fleece as it arrived home in a big shopping bag:
I even got to keep the 1st place ribbon this fleece won!
Fleece from: Ann Moffat in Schomberg

I've done a lot of reading lately on how to do this. I've ordered lots and lots of library books on the topic and read them pretty much cover to cover.
The locks in this fleece range in colour from pale silvery grey to very dark brown/black (pictured in the 2nd lock photo)

Once the locks are washed they needed to be picked apart before putting them on a drum carder. Then the drum carder combs the fleece into a batt which can be divided into roving so that it's ready to spin. You can also use drum carders to blend a variety of fleeces together. I'd like to try one sometime, but for now they're out of the budget at hundreds of dollars. In the future I may rent one.

Another way is to buy two hand carders (or mini-carders) and comb a small amount of locks at a time. Then you can roll up the fleece vertically into rolags for woolen spinning (lofty and fuzzy) or roll it up horizontally to make roving for worsted spinning (smoother, with aligned fibres). You can also use special sharp combs to comb out long locks.

The last way, which is the least expensive, is to just use a flick brush to comb out each lock. A dog brush works just as well, and that's what I have. As usual I'm trying to do things the simplest way I can without too many fancy tools, so that's one of the reasons I chose a fleece with well-defined locks so I could prepare it this way.
The locks vary in length, I've started working on the long (medium gray) ones

After flicking, I place the locks in a basket always aligned the same way, so I can spin consistently from tip to top. I like to store the combed locks as they are, then draft each one just before spinning it. Spinning such long locks took some getting used to, but I have the knack of it now.
The light and medium gray locks have a silvery sheen to them

My big disappointment has been discovering that while the combed locks are incredibly soft and fluffy, the resulting yarn has been a bit like twine. It still feels silky on the outside, but I can see now why long fleece is praised for being strong rather than soft.

Luckily I didn't expect next-to-skin softness. I want to make a warm hiking sweater that I've envisioned with deer/woodland motif intarsia. I figured I can make the intarsia motifs using the variety of natural colours in the fleece.
Usually I'm not one for swatching, being the impatient type, but in this case it's necessary as I have so much fleece to work with I want to make the best of it. I've spun a single, then navajo plied it, then knitted up a swatch. It's actually not bad. The skeined yarn looked kind of stiff and wiry but once knitted up it's smoother and softer than I expected.

I'm going to vary how I spin it and see which method gives me the best results. I can try fat singles, or spinning from the fold or a different number of plies. There's also the leftover soft fluff after flicking the locks and maybe that can be carded to create softer yarn. I'll let you know which method I choose in the end!

Read more...

OCAD Whodunit

>> Thursday, November 26, 2009

One of my donations to OCAD's Whodunit show,
pen & ink and watercolour


With all my rushing around last weekend I didn't manage to attend the OCAD Whodunit sale. This sale is an annual fundraising event that features artwork by students, emerging and established artists that are not named until after the show. Each piece of artwork is the same size, 5½” x 7½” and may be purchased for $75.

I was emailed about donating to this show, and I had determined to do it. Unfortunately I hurt my back near the deadline so I ended up staggering down to the OCAD building to deliver my artwork at the end of the last day it was due.

Today I found out that one of my paintings was chosen for the Gala Silent Auction and I was invited! The email didn't get to me in time as it was sent to the wrong address, people often miss the "L" in my email.
My other donation to OCAD's Whodunit show, featured in the Gala Silent Auction

I felt so flattered to be picked for that, it made me really happy as I was pretty insecure (as always..it's exhausting) about my artwork. I don't know yet if my two pieces of artwork were sold, but if they haven't they will be returned and I'll offer them for sale myself.

Read more...

Busy busy weekend

pretty apron from Susan

Last weekend was so busy! On Friday I met up with my friend Susan from Montreal, a fellow illustrator and crafter. She makes beautiful little needle felted animals that appear in the unbelievably charming vignettes in her calendar.

We did a bit of a swap and I don't want to make you jealous, but look at the lovely things Susan brought for me (as well as the apron on the top of this post!):
floral upholstery fabric, silk threads, striped ribbons, glass and mother-of-pearl buttons, silver ribbon, lacy white and blue ribbon, and not one but two versions of little red riding hood ribbons. I love everything so much!

We visited the workroom for the Sheridan student sale, and as usual we were greeted by the friendly Maisy, were inspired by the crafts, coveted the workroom fabrics and fed delicious cupcakes. Thank you Karyn!

On Saturday I rushed down with Bradley to the Movies & Makers craft show, hosted by Lisa of GirlCanCreate. I was nostalgic since I grew up going to the Fox Theatre every weekend for the matinees. Once again, lots of craft inspiration. And a delicious cupcake from Lisa, thank you!
That morning we just happened to pass by the Beaches United Church bazaar on Wineva Ave. and I found these adorable pillow cases. Bradley has graciously suggested that I am welcome to cut his up to make something else.
Shortly after that I met a friend to see the Sleeping Beauty ballet at the Four Seasons Centre. It was everything I had hoped, absolutely beautiful and full of fairytale wonderment. I bought a pair of pointe shoes that belonged to Juri Hiraoka who was Emerald. She was so lovely!

So that was my busy busy weekend.

Read more...

My non-slouchy slouchy hat

>> Tuesday, November 24, 2009

After all this spinning, I thought I should do a bit of knitting. So what did I do? Knit something with yarn I bought at the Royal Winter Fair.

It was a soft squooshy 100g skein from Sonny's Llama Farm. I found it in a basket at the Llama display. Now that I'm on Ravelry, it has changed my knitting. It's so great to be able to look up an item and find lots of patterns, even free ones, and then see what it looked like when other people made it.

This hat is my first Ravelry project! Here's the link:
http://www.ravelry.com/projects/needlebook/slouchy-copy-cat-hat
but I think you may need to be a member to view projects on Ravelry.

The pattern was for a slouchy hat but I didn't have enough yarn, so I shortened it to make a regular hat that would use up my skein as much as possible. Finishing a project and having just a short tail of yarn leftover is one of my big thrills in life. I love this hat! The pattern calls for worsted and my yarn was aran weight (a bit heavier) so it turned out really warm and squishy. Also llama yarn can be super warm, so the eyelets should help. The pattern is so easy, once you do the four rows for the first time, you can see where you are and carry on without looking at the pattern. And the eyelet mock cable stitch is very pretty.

In case you're not on Ravelry, the free pattern is here. I made another change in mine which was decreasing in the pattern. I thought it would look nice if I did that, especially as mine isn't slouchy. Here are my notes on that:

FINISHED
Note: I started decreasing after 5 1/4" instead of 8 1/2"
I changed the pattern so that it decreased in the pattern instead of all knit. It worked really well by ending on Row 3 of the Eyelet Mock Cable stitch, then decreasing as follows:

Row 1: K, YO, K, P2tog
Row 2: K3, P1
Row 3: SL1, K2, PSSO, P1
Row 4: K2, P1
Row 5: K2TOG, P1
Row 6: K1, P1
Row 7 on: same as pattern.

Read more...

City of Craft

>> Sunday, November 22, 2009

2009 Artwork by Amy Borkwood

As it turns out, I will have a table at City of Craft after all this year! An extra spot turned up due to a cancellation and I was picked. I'm very happy about it, this is my most favourite craft show ever.

Don't you just love the artwork??

Read more...

Navajo plying on a spindle

>> Friday, November 20, 2009

In case you hadn't noticed, I'm completely obsessed with spinning right now. It's a shame because I'm already a jack-of-all-trades and I really didn't need yet another craft to keep me busy. But there you go, it's something I can't help.

Anyway, here's something I've just learned. Navajo plying on a spindle! Before I finished the candy cane yarn I posted recently, I had finished spinning a single from the first batch of roving that I dyed with red, pink and green.

I forgot to take a picture of the single. I wish I had because it was incredibly fine. It took days to spin. I actually began to regret spinning it so fine, but decided to finish so I could see how it would turn out.

After reading a comment on my blog about Navajo plying, I looked it up and tried to discover if I could do this on my spindle. Thanks for the suggestion Rachel! I thought this would be a good solution for this yarn because I had spun it so fine that it would have been difficult to wind it in an Andean bracelet and it would have gotten really tangled. (I've learned I could wind it onto a nostepinne, but I don't have one yet.)
So here's what I've learned about Navajo plying on a spindle (with a reminder that I'm hardly an expert at this point):

What is Navajo plying?
Navajo plying is essentially the same as creating a crochet chain, but with long loops. As you pull the loop through, the two strands it creates combine with the original single strand and you spin all 3 to ply them together.

Why bother?
The benefits are that in the end you have a 3-ply yarn that maintains the colour sequence in your single. Also, as with Andean plying, you use every bit of your yarn and don't have to try to divvy up yarn into equally sized balls to ply together.

How do you learn how to do this?
I figured out Navajo plying after watching this video and this one (and a few others) a few times. Then I had to think about exactly how I would do it on my spindle.

My big confusion was about what happens to the "knot" in the chain. The answer is that it is there, but it can hide a bit behind the twist. This is one reason though, why you might want to make longer loops. Longer loops = fewer "knots". However, the length of the loops also affects the way the colours blend together.

Navajo plying on a drop spindle
This how I did it, but of course there are other ways. I decided to try it with parking the spindle and very long loops. It's probably not as fast as short loops without parking but it's a good way to learn.

Get Ready
Wind your single onto a spare spindle, or onto a bobbin, or something that will allow you to draw up the single easily. If you have it on a spare spindle you can hold that between your feet so that the shaft is pointing up and the yarn winds off easily. I don't have a spare spindle or bobbin, so I wound my single onto my niddy noddy and asked my husband to feed it to me. This isn't a long term solution as he is starting to resent spinning. I would like to get some bobbins and a Lazy Kate.

Get Started
1. Create the first loop (a slip knot - like starting a crochet chain) and attach that to your hook. The next loop will be pulled through this loop that has the hook in it. It's awkward but after this you'll be winding plied yarn on to the hook in the usual way with the loop (held open by your thumb) just above.
2. You'll be spinning counter-clockwise to ply. This is assuming of course that you spun your singles clockwise.

Plying steps
1. Park your spindle and draw a new loop through the existing loop. Make the new loop as long as you can. Align the single with the two strands this creates so that you have three strands. Always keep the loop open at the top by keeping your thumb through it. Tip: I found it easier to pull the loop through at a 90 degree angle rather than straight up. There's a risk of breakage, especially with very fine singles.

2. Spin your spindle until the three strands are plied and look the way you'd like them to. You can compare to other pictures of plied yarns, to see the angle of twist that seems right.

3. Wind the plied strand onto your spindle and repeat.

Afterwards
As usual, set the twist by washing your skein in warm water and hanging to dry. A nicely balanced yarn shouldn't need to be weighted to dry.

Read more...

Washing a fleece

>> Thursday, November 19, 2009

The fleece before washing

Ok, so as promised here is the mucky job of washing a fleece (thank you for your comment Melissa!). I have lots to say about this as I've definitely done it the wrong way, and now I think I may have hit upon the right way. For me.

My first fleece was loaned to me by the lovely Marnie. We were chatting at our local farmer's market and I was talking about spinning. It turned out Marnie had a fleece given to her, and hadn't gotten around to working with it yet. So she loaned it to me to try out washing a fleece.

To wash a fleece, you use very hot water, a grease reducing detergent (not soap) such as Dawn (added after the water is poured to reduce bubbles), and be careful not to agitate the fleece or it will felt. Just let the fleece sit in the water and soak. Take it out when the water becomes warm because you don't want it to sit there until the water is cold or it will get shocked when you put it into its next hot water bath.

The goal is to clean out any dirt, bits of twigs and grass, and the lanolin. Sometimes spinners don't clean out the lanolin, and spin directly. This is called spinning "in the grease" and apparently can be very nice on your hands and the finished garment then has a natural water barrier. Very helpful if you're a fisherman off the Isle of Aran, or like to go hiking in a British climate or things like that.
The fleece soaking in the tub

Full of energy, I recklessly decided to wash the entire fleece at once. This is fine, there's really nothing wrong with that, but it is a lot of work. The main issue is that generally a fleece is a very dirty thing. So most websites were recommending washing small amounts at a time so that there's a big proportion of water to fleece.
Filthy water!

What happened is that I put it in my bathtub and every time I soaked it the water was filthy. I think I had to give it at least six baths.
Holding the fleece to one side to drain the tub

And each time I was hanging over the tub sort of holding the fleece out of the way while the tub drained and pulling wool out of the drain guard again and again then swishing the tub clean and then refilling the tub and I ended up hurting my back. I could barely walk the next day.
One of the lovely clean locks

Anyway, once the fleece seemed to be reasonably clean, I laid it out to dry and that took days. Lots of days. Mainly because I didn't have room to really spread it out, so it was in a big heap on a towel on the floor. Until finally we had a reasonable sunny day and I put it outside to dry. This fleece is now in a big bag but the staple length (length of the locks) is quite short so I think I will need some carders before I can get it ready to spin.

So the right way, as you have probably guessed by now, is to wash your fleece a little bit at a time. I sorted my fleece by colour, light grey, medium grey, dark grey and brown/black. Then stored each in a separate bag. So now I'm working my way through the first bag. I've done one small batch (in the sink, standing up!) and it just took 3 soaks. Then I drained it and put it on a towel on a drying rack to dry. Washing should keep the locks intact. I separated the locks out on the towel and the next morning they felt pretty dry. It's best that they're not bone dry anyway so that if you prepare them with a flick brush there's less static.

I'll show you how I'm preparing my locks in another post...

Read more...

Christmas candy 2 ply

>> Tuesday, November 17, 2009

Before I show you the mucky job of cleaning fleece, here are some prettier pictures of another finished skein. This one started out with the "apple tree" roving.
If you're learning to spin and finding the drafting difficult the best tip is to pre-draft your roving. Gently pull at the roving until it's thinned out as evenly as you can. When roving is drafted out very thin it's called "pencil roving". After drafting I wind the roving back up into a big soft ball and it's lovely to work from when it's prepared this way.
The picture above shows how the single looked. The colours are mainly distinct, with a small amount of candy caning here and there. This is when you have two different colours of roving that you spin together. I like the way this looks so I purposely let it happen.

After spinning the singles I plied on the drop spindle using an Andean bracelet. At this stage the spindle can get really full. The spindle will still work but the yarn can sometimes slip down a bit. I wind a bit of painter's tape at the bottom of the shaft to keep the yarn secure.

After plying all the colours blended with mixes of red, white and green and I realized that it was starting to look a bit like Christmas candy.
This is the finished skein. This yarn is also in my shop, mainly because while I love the yarn, right now I'm all about the spinning.

Read more...

Royal Winter Fair

>> Monday, November 16, 2009

Angora rabbits being judged. They're just giant balls of fluff.

Yesterday we went to the Royal Winter Fair. I've been keen to go and attend the wool auction. They also had a drop spindle competition, and several spinning and weaving groups demonstrating spinning on a spinning wheel and weaving on a loom.

The main event was a sheep to shawl competition where the participants spin the yarn straight from the fleece, then weave a shawl which ends up being judged then finally sold at the wool auction. They also auctioned the skeins that were spun on drop spindles but I was there for a fleece!

Beforehand they have long tables with all the fleeces laid out so you can have a look (and touch!) before bidding. They also print out a catalogue at the last minute once they have all the information about the fleeces. Fleeces are sold by the pound, so you bid a price per pound that you want to pay.

There's a range of sizes, this time there were fleeces weighing from 3.2 to 11.2 pounds. I wanted a smaller fleece, in a continuing effort to not fill our house entirely with craft things.
I used my catalogue to write notes about the fleeces I was interested in bidding on. I didn't really know how much they would go for, so I didn't want to fixate on one special fleece and end up with nothing if it was too expensive. The prices ended up at $4.50/lb up to $21/lb.

There's a wide range, this is one of the white fleeces, soft and fluffy with a fine crimp:
This one was the grand prize winner, fine and soft with a tiny crimp:
This one went for $20 per pound, special and lovely

Surprisingly the prices weren't always based on whether the fleece had won a prize. Some of the top prize winners went for very reasonable prices of $6 - $7 per pound. I was writing down all the prices during the auction to try to see how much I should bid on my favourites. It was a bit nerve wracking. Near the end the prices seemed to be going right up, and I still hadn't won a fleece. There was a white one I wanted but it went up to $13 and I gave up.

I really wanted one of the natural grey/brown fleeces and ended up winning one of the last auctions. My fleece had long glossy wavy locks that I think is a Lincoln long hair. In then end I paid $7.50/lb and it was a first prize winner. I was very happy about that. It's so gorgeous, I can't wait to spin it up! I'll show how I'm going to process my fleece in my next post...

Read more...

Filling the shop

>> Wednesday, November 11, 2009

Green crocheted pincushion with feedsack top

Lots more things have been making their way into my shop!
Linen embroidered needle book

Grey lambswool crocheted bag with lace

Read more...

Shop updates - pincushions!

>> Wednesday, November 04, 2009

I've been using my little skeins of homespun yarn to make some new creations for the shop. I wasn't chosen to be in City of Craft this year, so rather than save my handmade things they're going into my etsy shop.

These little pincushions are crocheted with my handspun yarn, with fabric sewn on top and some vintage button and wool felt embellishment. The brown one has a bit of feedsack, and the pink one is just one of many bits of fabric I had on hand. I knew all that hoarding would eventually be useful!

Read more...

  © Blogger template Simple n' Sweet by Ourblogtemplates.com 2009

Back to TOP