Busy busy weekend

>> Thursday, November 26, 2009

pretty apron from Susan

Last weekend was so busy! On Friday I met up with my friend Susan from Montreal, a fellow illustrator and crafter. She makes beautiful little needle felted animals that appear in the unbelievably charming vignettes in her calendar.

We did a bit of a swap and I don't want to make you jealous, but look at the lovely things Susan brought for me (as well as the apron on the top of this post!):
floral upholstery fabric, silk threads, striped ribbons, glass and mother-of-pearl buttons, silver ribbon, lacy white and blue ribbon, and not one but two versions of little red riding hood ribbons. I love everything so much!

We visited the workroom for the Sheridan student sale, and as usual we were greeted by the friendly Maisy, were inspired by the crafts, coveted the workroom fabrics and fed delicious cupcakes. Thank you Karyn!

On Saturday I rushed down with Bradley to the Movies & Makers craft show, hosted by Lisa of GirlCanCreate. I was nostalgic since I grew up going to the Fox Theatre every weekend for the matinees. Once again, lots of craft inspiration. And a delicious cupcake from Lisa, thank you!
That morning we just happened to pass by the Beaches United Church bazaar on Wineva Ave. and I found these adorable pillow cases. Bradley has graciously suggested that I am welcome to cut his up to make something else.
Shortly after that I met a friend to see the Sleeping Beauty ballet at the Four Seasons Centre. It was everything I had hoped, absolutely beautiful and full of fairytale wonderment. I bought a pair of pointe shoes that belonged to Juri Hiraoka who was Emerald. She was so lovely!

So that was my busy busy weekend.

Read more...

My non-slouchy slouchy hat

>> Tuesday, November 24, 2009

After all this spinning, I thought I should do a bit of knitting. So what did I do? Knit something with yarn I bought at the Royal Winter Fair.

It was a soft squooshy 100g skein from Sonny's Llama Farm. I found it in a basket at the Llama display. Now that I'm on Ravelry, it has changed my knitting. It's so great to be able to look up an item and find lots of patterns, even free ones, and then see what it looked like when other people made it.

This hat is my first Ravelry project! Here's the link:
http://www.ravelry.com/projects/needlebook/slouchy-copy-cat-hat
but I think you may need to be a member to view projects on Ravelry.

The pattern was for a slouchy hat but I didn't have enough yarn, so I shortened it to make a regular hat that would use up my skein as much as possible. Finishing a project and having just a short tail of yarn leftover is one of my big thrills in life. I love this hat! The pattern calls for worsted and my yarn was aran weight (a bit heavier) so it turned out really warm and squishy. Also llama yarn can be super warm, so the eyelets should help. The pattern is so easy, once you do the four rows for the first time, you can see where you are and carry on without looking at the pattern. And the eyelet mock cable stitch is very pretty.

In case you're not on Ravelry, the free pattern is here. I made another change in mine which was decreasing in the pattern. I thought it would look nice if I did that, especially as mine isn't slouchy. Here are my notes on that:

FINISHED
Note: I started decreasing after 5 1/4" instead of 8 1/2"
I changed the pattern so that it decreased in the pattern instead of all knit. It worked really well by ending on Row 3 of the Eyelet Mock Cable stitch, then decreasing as follows:

Row 1: K, YO, K, P2tog
Row 2: K3, P1
Row 3: SL1, K2, PSSO, P1
Row 4: K2, P1
Row 5: K2TOG, P1
Row 6: K1, P1
Row 7 on: same as pattern.

Read more...

City of Craft

>> Sunday, November 22, 2009

2009 Artwork by Amy Borkwood

As it turns out, I will have a table at City of Craft after all this year! An extra spot turned up due to a cancellation and I was picked. I'm very happy about it, this is my most favourite craft show ever.

Don't you just love the artwork??

Read more...

Navajo plying on a spindle

>> Friday, November 20, 2009

In case you hadn't noticed, I'm completely obsessed with spinning right now. It's a shame because I'm already a jack-of-all-trades and I really didn't need yet another craft to keep me busy. But there you go, it's something I can't help.

Anyway, here's something I've just learned. Navajo plying on a spindle! Before I finished the candy cane yarn I posted recently, I had finished spinning a single from the first batch of roving that I dyed with red, pink and green.

I forgot to take a picture of the single. I wish I had because it was incredibly fine. It took days to spin. I actually began to regret spinning it so fine, but decided to finish so I could see how it would turn out.

After reading a comment on my blog about Navajo plying, I looked it up and tried to discover if I could do this on my spindle. Thanks for the suggestion Rachel! I thought this would be a good solution for this yarn because I had spun it so fine that it would have been difficult to wind it in an Andean bracelet and it would have gotten really tangled. (I've learned I could wind it onto a nostepinne, but I don't have one yet.)
So here's what I've learned about Navajo plying on a spindle (with a reminder that I'm hardly an expert at this point):

What is Navajo plying?
Navajo plying is essentially the same as creating a crochet chain, but with long loops. As you pull the loop through, the two strands it creates combine with the original single strand and you spin all 3 to ply them together.

Why bother?
The benefits are that in the end you have a 3-ply yarn that maintains the colour sequence in your single. Also, as with Andean plying, you use every bit of your yarn and don't have to try to divvy up yarn into equally sized balls to ply together.

How do you learn how to do this?
I figured out Navajo plying after watching this video and this one (and a few others) a few times. Then I had to think about exactly how I would do it on my spindle.

My big confusion was about what happens to the "knot" in the chain. The answer is that it is there, but it can hide a bit behind the twist. This is one reason though, why you might want to make longer loops. Longer loops = fewer "knots". However, the length of the loops also affects the way the colours blend together.

Navajo plying on a drop spindle
This how I did it, but of course there are other ways. I decided to try it with parking the spindle and very long loops. It's probably not as fast as short loops without parking but it's a good way to learn.

Get Ready
Wind your single onto a spare spindle, or onto a bobbin, or something that will allow you to draw up the single easily. If you have it on a spare spindle you can hold that between your feet so that the shaft is pointing up and the yarn winds off easily. I don't have a spare spindle or bobbin, so I wound my single onto my niddy noddy and asked my husband to feed it to me. This isn't a long term solution as he is starting to resent spinning. I would like to get some bobbins and a Lazy Kate.

Get Started
1. Create the first loop (a slip knot - like starting a crochet chain) and attach that to your hook. The next loop will be pulled through this loop that has the hook in it. It's awkward but after this you'll be winding plied yarn on to the hook in the usual way with the loop (held open by your thumb) just above.
2. You'll be spinning counter-clockwise to ply. This is assuming of course that you spun your singles clockwise.

Plying steps
1. Park your spindle and draw a new loop through the existing loop. Make the new loop as long as you can. Align the single with the two strands this creates so that you have three strands. Always keep the loop open at the top by keeping your thumb through it. Tip: I found it easier to pull the loop through at a 90 degree angle rather than straight up. There's a risk of breakage, especially with very fine singles.

2. Spin your spindle until the three strands are plied and look the way you'd like them to. You can compare to other pictures of plied yarns, to see the angle of twist that seems right.

3. Wind the plied strand onto your spindle and repeat.

Afterwards
As usual, set the twist by washing your skein in warm water and hanging to dry. A nicely balanced yarn shouldn't need to be weighted to dry.

Read more...

Washing a fleece

>> Thursday, November 19, 2009

The fleece before washing

Ok, so as promised here is the mucky job of washing a fleece (thank you for your comment Melissa!). I have lots to say about this as I've definitely done it the wrong way, and now I think I may have hit upon the right way. For me.

My first fleece was loaned to me by the lovely Marnie. We were chatting at our local farmer's market and I was talking about spinning. It turned out Marnie had a fleece given to her, and hadn't gotten around to working with it yet. So she loaned it to me to try out washing a fleece.

To wash a fleece, you use very hot water, a grease reducing detergent (not soap) such as Dawn (added after the water is poured to reduce bubbles), and be careful not to agitate the fleece or it will felt. Just let the fleece sit in the water and soak. Take it out when the water becomes warm because you don't want it to sit there until the water is cold or it will get shocked when you put it into its next hot water bath.

The goal is to clean out any dirt, bits of twigs and grass, and the lanolin. Sometimes spinners don't clean out the lanolin, and spin directly. This is called spinning "in the grease" and apparently can be very nice on your hands and the finished garment then has a natural water barrier. Very helpful if you're a fisherman off the Isle of Aran, or like to go hiking in a British climate or things like that.
The fleece soaking in the tub

Full of energy, I recklessly decided to wash the entire fleece at once. This is fine, there's really nothing wrong with that, but it is a lot of work. The main issue is that generally a fleece is a very dirty thing. So most websites were recommending washing small amounts at a time so that there's a big proportion of water to fleece.
Filthy water!

What happened is that I put it in my bathtub and every time I soaked it the water was filthy. I think I had to give it at least six baths.
Holding the fleece to one side to drain the tub

And each time I was hanging over the tub sort of holding the fleece out of the way while the tub drained and pulling wool out of the drain guard again and again then swishing the tub clean and then refilling the tub and I ended up hurting my back. I could barely walk the next day.
One of the lovely clean locks

Anyway, once the fleece seemed to be reasonably clean, I laid it out to dry and that took days. Lots of days. Mainly because I didn't have room to really spread it out, so it was in a big heap on a towel on the floor. Until finally we had a reasonable sunny day and I put it outside to dry. This fleece is now in a big bag but the staple length (length of the locks) is quite short so I think I will need some carders before I can get it ready to spin.

So the right way, as you have probably guessed by now, is to wash your fleece a little bit at a time. I sorted my fleece by colour, light grey, medium grey, dark grey and brown/black. Then stored each in a separate bag. So now I'm working my way through the first bag. I've done one small batch (in the sink, standing up!) and it just took 3 soaks. Then I drained it and put it on a towel on a drying rack to dry. Washing should keep the locks intact. I separated the locks out on the towel and the next morning they felt pretty dry. It's best that they're not bone dry anyway so that if you prepare them with a flick brush there's less static.

I'll show you how I'm preparing my locks in another post...

Read more...

Christmas candy 2 ply

>> Tuesday, November 17, 2009

Before I show you the mucky job of cleaning fleece, here are some prettier pictures of another finished skein. This one started out with the "apple tree" roving.
If you're learning to spin and finding the drafting difficult the best tip is to pre-draft your roving. Gently pull at the roving until it's thinned out as evenly as you can. When roving is drafted out very thin it's called "pencil roving". After drafting I wind the roving back up into a big soft ball and it's lovely to work from when it's prepared this way.
The picture above shows how the single looked. The colours are mainly distinct, with a small amount of candy caning here and there. This is when you have two different colours of roving that you spin together. I like the way this looks so I purposely let it happen.

After spinning the singles I plied on the drop spindle using an Andean bracelet. At this stage the spindle can get really full. The spindle will still work but the yarn can sometimes slip down a bit. I wind a bit of painter's tape at the bottom of the shaft to keep the yarn secure.

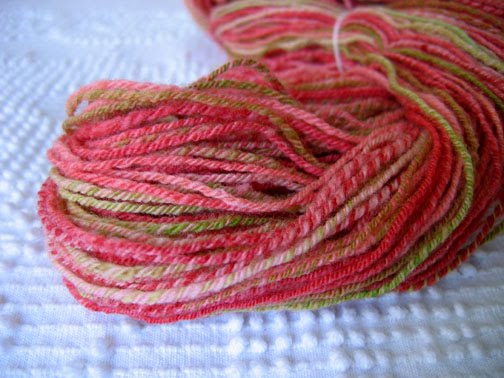
After plying all the colours blended with mixes of red, white and green and I realized that it was starting to look a bit like Christmas candy.
This is the finished skein. This yarn is also in my shop, mainly because while I love the yarn, right now I'm all about the spinning.

Read more...

Royal Winter Fair

>> Monday, November 16, 2009

Angora rabbits being judged. They're just giant balls of fluff.

Yesterday we went to the Royal Winter Fair. I've been keen to go and attend the wool auction. They also had a drop spindle competition, and several spinning and weaving groups demonstrating spinning on a spinning wheel and weaving on a loom.

The main event was a sheep to shawl competition where the participants spin the yarn straight from the fleece, then weave a shawl which ends up being judged then finally sold at the wool auction. They also auctioned the skeins that were spun on drop spindles but I was there for a fleece!

Beforehand they have long tables with all the fleeces laid out so you can have a look (and touch!) before bidding. They also print out a catalogue at the last minute once they have all the information about the fleeces. Fleeces are sold by the pound, so you bid a price per pound that you want to pay.

There's a range of sizes, this time there were fleeces weighing from 3.2 to 11.2 pounds. I wanted a smaller fleece, in a continuing effort to not fill our house entirely with craft things.
I used my catalogue to write notes about the fleeces I was interested in bidding on. I didn't really know how much they would go for, so I didn't want to fixate on one special fleece and end up with nothing if it was too expensive. The prices ended up at $4.50/lb up to $21/lb.

There's a wide range, this is one of the white fleeces, soft and fluffy with a fine crimp:
This one was the grand prize winner, fine and soft with a tiny crimp:
This one went for $20 per pound, special and lovely

Surprisingly the prices weren't always based on whether the fleece had won a prize. Some of the top prize winners went for very reasonable prices of $6 - $7 per pound. I was writing down all the prices during the auction to try to see how much I should bid on my favourites. It was a bit nerve wracking. Near the end the prices seemed to be going right up, and I still hadn't won a fleece. There was a white one I wanted but it went up to $13 and I gave up.

I really wanted one of the natural grey/brown fleeces and ended up winning one of the last auctions. My fleece had long glossy wavy locks that I think is a Lincoln long hair. In then end I paid $7.50/lb and it was a first prize winner. I was very happy about that. It's so gorgeous, I can't wait to spin it up! I'll show how I'm going to process my fleece in my next post...

Read more...

Filling the shop

>> Wednesday, November 11, 2009

Green crocheted pincushion with feedsack top

Lots more things have been making their way into my shop!
Linen embroidered needle book

Grey lambswool crocheted bag with lace

Read more...

Shop updates - pincushions!

>> Wednesday, November 04, 2009

I've been using my little skeins of homespun yarn to make some new creations for the shop. I wasn't chosen to be in City of Craft this year, so rather than save my handmade things they're going into my etsy shop.

These little pincushions are crocheted with my handspun yarn, with fabric sewn on top and some vintage button and wool felt embellishment. The brown one has a bit of feedsack, and the pink one is just one of many bits of fabric I had on hand. I knew all that hoarding would eventually be useful!

Read more...

I get it now - spinning again

>> Friday, October 30, 2009

My fascination with spinning continues... and as you can see I have a beautiful new spindle. I'm going to post about those soon.

One last note about the Kool-Aid dyeing. Afterwards your roving will look a bit sad, you may have squeezed it to get the water out and then hung it up and it will have that drenched kitten look. All the fluffiness will be gone and you may worry that you accidentally felted it.
You may pick at it and stretch it in an effort to see if you turned that lovely fluffy merino roving into a big fat piece of rope. My advice to you is to wait. Let it dry and it will be all fluffy again in the morning.
I even learned how to braid the roving (this funny tutorial) and now it's looking its best again. Well a wee bit fuzzy but it seems to still draft easily. I'm calling this colourway Apple Tree because it has a range of apple red, pale pink and green. My other strand of roving has the same colours plus a tiny hint of blue which makes me think of picking apples on a sunny day with a bright blue sky.
For ages I've seen dyed roving in yarn stores and not really seen the appeal. But what I know now after learning to spin is that it's so amazing how those patchy colours turn into pretty strands of colour that change again when you ply them. I'm not sure what I'll be left with in the end, but I love the process.

Read more...

Kool-Aid dyeing revisited

>> Thursday, October 29, 2009

This morning I did a little Kool-Aid dyeing with some white roving I had in my stash. I've been seeing fat braids of yummy hand painted roving online but I'm feeling poor so I decided I should try it myself. We'll see how it goes...

I've noticed that roving with mixed colours can look garish, but once spun up and plied it changes how the colours work together. I've been seeing stunning examples on Flickr which have really inspired me.

While looking up info on spinning I found some tips on dyeing roving. I was reminded about how easy it is to do dyeing with Kool-Aid which allows you to use your regular dishes. I even had some Kool-Aid left over from dyeing yarn a long time ago so I didn't even have to go to a bunch of grocery stores trying to find a range of flavours.

Steps:

1. Add warm water and 1/2 cup of vinegar to a microwaveable dish. I used a ceramic dish. Place your roving lined up in rows to soak. You can push the roving down into the water but throughout the process handle it gently so that it doesn't felt - no twisting/wringing etc. And no moving the wool from hot to cold which shocks the fibres and can lead to felting.
*Don't use a rectangular dish that won't fit into your microwave because you will be sorry when you have to try to move a soppy mess of Kool-Aid soaked roving into another smaller dish and you will be very frustrated and feel stupid. Ask me how I know.

I mixed a variety of flavours: orange, strawberry, lemon-lime and raspberry with red and blue food colouring

2. While the roving is soaking you can organize your colours. I opened the packets of Kool-Aid into glasses of water and stirred them. You can use some paper towel as a palette to dab with each colour so that you can see it clearly. Mixing can give you colours like brown and olive green, if you prefer bright colours don't mix! Of course you can add extra water to dilute a colour and make it lighter.

3. After soaking the roving for 10 minutes I applied the Kool-Aid. Pour or spoon the Kool-Aid onto the wool wherever you'd like the colour to go. You can use a spoon to gently pat and spread the colour around. Remember it will blend a bit more by itself.

4. When you're happy with how the roving looks carefully place the dish in the microwave. The water should just barely cover the yarn.

5. Microwave for 5 minutes and take out your dish using oven mitts. Tilt the dish a tiny bit so that you can see the water. If it's clear then the wool has absorbed the dye.
This is the only picture I took of roving in the dish, this one was a bit of a mistake, I meant the colours to be more distinct. I'll wait and see how it looks spun up & plied

6. Let the dish of roving sit and cool down. Once it's cool you can rinse the roving and pat with a towel before hanging to dry. Remember not to twist or wring the yarn.

Next post you can see how mine turned out!

Read more...

Green yarn done!

>> Wednesday, October 28, 2009

I am so proud of this yarn I can't tell you

Thanks so much for the comments in my last post. I took your advice Amberlee, and decided I should ply my green yarn after all. I loved the way it looked before, and the delicate weight, but am resigned to the fact that it wouldn't make socks that would last. Now that the yarn is plied it's worsted weight so the socks will be nice and warm. The colours have blended to create an overall greenness.
Now I need a niddy noddy so I can make skeins without my husband's hands

Anna's comment led me to her beautiful blog, wildflowers::pretty which coincidentally had a post with a nice simple sock pattern for worsted weight yarn. At the bottom of the post there are some handy links for anyone new to sock knitting. I love the nice simple brown socks she made. So I think that's the pattern I'll start with and see how it goes.

p.s. I found errata for this sock pattern on Ravelry posted by jeaniesmith. Become my Ravelry friend: my name is needlebook!

Read more...

More spinning

>> Monday, October 26, 2009

I was right, spinning has proven to be very addictive. This is my first ball of yarn. In case anyone is wondering, I did the whole first skein using "park and draft". I tried spinning and drafting at the same time and just couldn't manage it.

Near the end I was starting to think I could but I didn't want to mess up my first skein by trying to move beyond park and draft. This first ball of yarn is quite thick, mainly because when I started that's all I could do, but also I wanted to keep it consistent so by the end I was trying to make it thick to match.

For my second ball, I did spin the roving into a thinner yarn and started to spin without having to park the spindle all the time. Anytime I had trouble drafting I'd park it to catch up. I had a small piece of pink roving and a small piece of orange, so I spun them up so that I could try plying.
This is what I ended up with:
One reason to ply is to create thicker yarn. It can also strengthen the yarn, and even out thicker and thinner areas. But my favourite reason is that it balances out the yarn so that it sets the twist for you. No need to soak and wait for your yarn to dry in order to set the twist.

I loved plying because it goes a lot faster than spinning. It's quite satisfying. All you do is spin your drop spindle in the opposite direction (ie. spin clockwise, ply counter-clockwise). Once you've done a length, you can let it hang down and if it stays in a smooth "U" it's perfect. If it twists up on itself you can add or decrease the amount of twist until it suits you.

Next I used a large piece of orange/brown/purple dyed roving to practise spinning without parking the spindle. I really have the hang of it now. It helped to pre-draft the roving by pulling it gently into thinner strands. I also learned to gently wind the roving around my wrist to keep it out of the way while spinning.Then I used a youtube video to learn how to wrap the yarn into an Andean bracelet. This is a way to wind the yarn so that you can pull from both ends and ply together until every bit is used. This way you don't have to try dividing your yarn into two equal parts before plying.

This is how that yarn turned out:
My latest spinning project is using a larger amount of roving (almost 4 ounces) of green/brown/blue roving:
I should have enough to knit some socks with it. I love wool socks and they can be expensive so it's a good way to practise spinning while creating something I'd actually really like to have. This roving made such pretty yarn, with strands of green and brown and blue:
I'm not sure whether or not to ply this yarn. I like the way it looks now, so I suspect not. Right now if I wind it around a ruler it comes out to about 22 wraps per inch (WPI) which is lace weight according to charts I've found online. Now I just have to find the perfect sock pattern!

Read more...

Textile Museum - Decorator Fabric Sale

>> Friday, October 23, 2009

$2 small pink piece of fabric, $5 larger brown wool piece of fabric

Today I rode my bicycle downtown and had a quick peek at the fabric sale at the Textile Museum. This one is a lot smaller than the big sale in the Spring, but it was still worth going. There's some fabric outside on tables, then upstairs there is a large room with more fabric, some buttons and some handmade items.

I bought a scrap of pink fabric, a piece of brown wool fabric and some buttons:
$20 set of four antique glass buttons, $2 MOP button, $3 MOP button

I chose two mother-of-pearl buttons and a set of four antique glass buttons. The buttons are special, so while these were expensive I think they were good value... well I don't really know but the four on the right are the prettiest buttons I've ever seen and I knew if I went home without them I would be thinking about them later.

It's not too late for you to go too! Here's the info:
p.s. they were saying that new buttons would be for sale on Saturday so you all the best things won't be gone if you go then!

For the Love of Cloth: Decorator Fabric Sale

Friday October 23 11:00 am - 5:00 pm and
Saturday October 24 11:00 am - 3:00 pm

Textile Museum of Canada
55 Centre Avenue (Dundas St. W & University Ave., St. Patrick subway)
Toronto, Ontario
M5G 2H5
(416) 599-5321

Read more...

Making yarn

>> Tuesday, October 20, 2009

Thank you to everyone who came to the Rummage Show at the Workroom. I had a great time with lots of fun chatting and a bit of swapping. I did manage to sell lots of things and so it was a big success for me as I went home with a lot less than I brought even though I picked up lots of nice new craft supplies.

Lately as the weather gets cooler I've been turning to the woolier crafts and my new interest is hand spinning. I had bought a drop spindle at a craft show but couldn't manage to spin with it. I picked it up again the other day and realized I should try Youtube for some more tips. I found a great tutorial by the spinning guru Abby Franquemont and that made all the difference.

The big tip is to begin by trying the "park and draft" technique. This means that you can "build up twist" in your yarn by spinning the spindle, then hold it between your knees so that it doesn't have a chance to spin backwards, then take your time "drafting" your roving.

Drafting means pulling gently at the roving to thin it out to create the thickness of the yarn you want. It can take time to learn how to do this while keeping the spindle spinning, so "parking" the spindle gives you as much time as you want. While the yarn is building up twist you pinch it so that the twist doesn't travel up into your roving until you've finished drafting.

I finally finished my first skein of yarn! The picture at the top of this post is the yarn wound up on the spindle. The picture below is the yarn transferred to a pair of wooden purse handles. I just had them lying around (they were up for offer at the Rummage Show and didn't sell, so that was lucky). The main object is to keep the tension in the yarn so that it doesn't get all twisty.Then I "set the twist" by soaking the yarn for 10 minutes in hot water. After that I took the yarn off the handles thinking that it might dry quicker. But this was a mistake as the twists showed up again and the whole ball got all kinked up:So I carefully wound the yarn back onto the handles to dry:Seems ok now! It seems this stage is akin to blocking a hand knit sweater.

Lastly, I am no expert with hand spinning. The whole thing is new to me. So if you'd like to read along as I learn how please do, but turn to the experts if you want information you can rely on! More experienced spinners are welcome to leave comments telling me what I'm doing wrong as I'm keen to learn. And then other people can benefit from your expertise too. And one warning to those of you who would like to try this: I suspect it will become quite addictive...

Read more...

  © Blogger template Simple n' Sweet by Ourblogtemplates.com 2009

Back to TOP