Showing posts with label sewing. Show all posts

Acorn needle book - redesigned

>> Wednesday, August 24, 2011

Just in time for fall, here's an update to my acorn needle book. I happened to find a little length of Japanese ribbon with squirrels on it at a sweet little shop called Polka Dot Kids. I don't have kids but for some reason... I'm not sure why... I still go into this shop anytime I'm passing by.

Often I tell myself I'd better not splurge on something just because it's adorable. But ribbon with squirrels on it? Well that's actually a logical addition to my sewing supplies. In fact, since I didn't already have ribbon with squirrels on it, I was essentially filling a gap in my supplies. You know, being practical.

So now the acorn needle book is back, with a little squirrel ribbon for a stem and quilt batting inside to give it more structure. I redesigned the shape to be more symmetrical after realizing that the front needed to match the back so that it all lines up when assembled. The acorn needle book is in my shop now, with more on the way.


Read more...

Quilted pouches

>> Monday, August 08, 2011

I've been taking a little blogging holiday this summer, apparently. So here's a little post just to get back into the habit, some new quilted pouches that are making their way into my shop today... The colours of some of them didn't come out quite right in the photographs so I'm fussing with them, but the first three are in there now.

Read more...

Belinda and Lucinda

>> Tuesday, March 29, 2011

As I mentioned in my last post, I've been looking forward to making this sweet pair of Edith Flack Ackley dolls ever since I saw the picture advertising the pattern. This vintage pattern makes a surprisingly small pair of dolls. Well, I was surprised, but also delighted by how nice they are. Also the clothes are removable which I always prefer.
This picture with a teacup gives you an idea of their size.
Like my previous EFA doll, these have a dress, petticoat and pantalettes. The pattern also suggests a necklace and I thought it would nice for them to have matching glass bead necklaces.
If you're thinking of making this pattern yourself I did make some small changes. First of all the pantalettes seem very wide so you would probably want to reduce those - just shave off from the side of the pattern (thanks to Margaret for that tip!). Also the petticoat is not as wide as the skirt so you could make it wider if you want it to be fuller. On the other hand as the doll is so small this can make it bulkier around the waist. For the dress I found the front bodice to be a little wide so I tweaked that too.

Don't be discouraged part way through once you've turned the doll right side out and it seems pathetic and too narrow. Once you firmly stuff and stitch at the joints the doll has a very nice shape. Also I recommend FrayBlock at the areas where you need to trim the seams very closely such as under the arms.
I made a few little changes just to suit me. For example the pattern suggests drawing the shoes on with ink, but I ended up sewing fabric directly on the foot to make the shoes. I thought the wool felt I had on hand would have been too thick. I also stitched a little seam on the arms, just once, so that they bend at the elbow. Just little changes like that.

I love how they turned out and must thank Margaret once again for kindly sharing her pattern.

Read more...

More needle books

>> Thursday, November 18, 2010

Here's a peek at one of Bradley's birthday presents from October.
His very own custom robot needle book, with his name embroidered on the front and a robot print inside.
mustard linen woodland embroidered needle book
Yesterday I finally finished my last in a batch of new needle books, some in mustard with flowered branches..

and some in pink with red and pink flowers..
pink embroidered needle book

So these new ones are shaped like an acorn.
acorn needle book

The front and back covers have the cap pieced together with the nut part, then lined. The tricky part was the little stem but that really did seem necessary. Even the pages inside are shaped like acorns! Sewing together all the layers at the end can be tricky, the wool tends to shift and it all ends up a bit wonky. So I just did it by hand while a big clip held it all together. All these new needle books are in my etsy shop and will be coming with me to Crafternoon Tea.

ALSO, I just found out there's a spot for me at City of Craft! Hurray! More about that later..

Read more...

Zippered wristlets!

>> Monday, October 25, 2010

I've finally figured out how to adapt my wristlets to include a zipper. A couple of people have told me they wished my wristlets had zippers at craft shows and I thought it was a good idea too (see? I do listen to you!).
I just had to figure out how to add the zipper with the front flap there as well. I have a few ready now and I've started putting them in my shop. I love the pink and purple floral fabric on this one. Have a look!

Read more...

Yellow log cabin quilt

>> Thursday, October 14, 2010

I've been wanting to make a yellow quilt forever. So just in time for the rainy days we've been having, I've finally gathered up the yellow prints I had on hand. I've never sewn a log cabin quilt square before, but I've read online that it's addictive. Now that I've made my first one I can confirm that it's true! I decided to do my cutting freehand, just making strips as I went along and not worrying about having them all be the same width.

I like the result. At the end I will true up each square using a cardboard template and then when I join all the squares my quilt won't be too wonky! At the end when I have a stack of squares I can arrange them before joining them together and make sure the quilt is balanced. I'm not sure yet whether I'll add sashing (extra strips between the squares).

As usual I have hoarded tiny scraps of my favourite prints, so it's been very nice to finally be able to use even the smallest pieces. Things have been busy lately so this quilt could go very slowly, but I've decided I'd rather just do a square at a time, and not cut it all out beforehand, and maybe even not do any chain piecing. I've found it very relaxing to just choose and cut a piece at a time and put it all together.
This square went together very quickly so I think you could whip up a quilt top this way in no time. For the quilt back I think I'll just keep an eye out for a vintage sheet with some yellow. My quilt is going to be so cheerful!

Read more...

New items in my shop!

>> Tuesday, September 07, 2010

There are lots of new things in my shop now...
I just needed to get started with updating it again. I had some new wristlets ready, particularly two in one of my favourite barkcloth prints, a painting by Grandma Moses. The bits I've picked are snowy woods, one of them with a little cottage:
 I had a navy blue floral sweethaven bag ready as well:
The blue needlebook is the last one of that batch and I'll make some new ones soon in a different set of colours:
And a special bonus just for my blog readers - buy any wristlet, bag or needle book from my shop and mention this blog in the comments and I will send a free bonus, one of my little deer print pincushions!
NOTE * Each pincushion is a little different, offer good for September 2010, while quantities last. *
 Thanks for looking!

Read more...

How to sew a pillow with piping, a zipper and a lining

>> Wednesday, September 01, 2010

So I was looking this up online and I could find pillow tutorials with a couple of these features but not all three. I took some time to figure it out and now I'm going to show you how I did it!

Just one note, I did it with 1. a regular zipper and 2. a regular zipper foot. It's also put together with materials I had already. So there are other ways to do it, such as with an invisible zipper, but in the end I was really happy with the results.
First of all, the fabric. I had a beautiful end piece of hand printed chintz that I found at the Textile Museum Sale. It's a gorgeous 1920s Scalamandre pictorial print called China Rose, and there was actually just enough to make two large covers, the same size as the existing cushions I had on the couch.

Here's my trick for cutting out matching cushions with a pictorial print. Arrange the two halves of fabric so that the print is aligned then cut out two matching front pieces and two matching back pieces. The front is different from the back on each pillow but the two pillows match. Just a nice little detail.

To make your piping cut narrow strips of fabric on the bias and use it to cover a length of cord. You can buy cord for piping by the yard at fabric stores. You can use ready-made bias tape to cover your cord, the same fabric as your cushion, or a contrasting solid or print fabric. I used an olive green that matched the leaves in the print.

Despite the fact that this is a very nice fabric, it was a little bit thin for pillows. This means that without a lining the pillow wouldn't have a nice smooth luxurious look that does justice to the fabric. So I cut out two more squares of sturdy white cotton fabric for the linings.
Now that you have all that prepared you're ready to put it together.
STEP 1. Using your zipper foot, attach the piping to the top side of the cushion. 
Snip 3 little cuts in the extra fabric of your piping so that you can bend it neatly at the corners.
When you get to the end, pull the cord from one side out of its fabric casing a little bit, and trim the cord at an angle.
Then open up the empty fabric casing and fold it over the other end of piping. It's hard to describe this but it makes a neat join without two thicknesses of cord overlapping.
Don't do it right at the corner like I did, it's more difficult if you're working your way around the bend at the same time. I wasn't thinking ahead!
STEP 2. Attach the zipper to the bottom of the cushion (with an overall pattern it doesn't matter which side you attach it to). Place the zipper face down and open next to the piping and sew it as closely as you can to the piping.
Close the zipper and sew it to the back of the cushion.

This is what you have at this stage, the cover has the piping and zipper attached:
At this point you can decide you've had enough and finish your cushion without a lining. Just open your zipper up, pin the cushion right sides together, sew the three sides and you're done! You can serge or pink the edges of the fabric so that they don't fray. If you don't have a serger and the fabric is really prone to fraying (such as a loosely woven wool) you can cover the edges with bias tape.

Otherwise if you'd like a lining carry on to STEP 3.
STEP 3. Attach the lining piece to the zipper. The zipper will be sandwiched between the lining and the outer fabric. Pin it in place then open up to see if it's right before you sew. When the lining pieces are attached there should be nicely finished sides on both sides of the zipper - no raw edges showing. Repeat for the second lining piece. At this point I like to finger press the fabric next to the zipper so it doesn't get snagged when the zipper is opening and closing.

This is how it should look:
So far you have only joined the lining on the zipper side.
STEP 4. Align the cushion cover so that the the outside pieces are facing each other, right sides together, and the lining pieces are facing each other as well. Pin all around carefully. Make sure the zipper is open!

STEP 5. Sew all the way around, but leave a 6" gap at the bottom of the lining. Remove the pins as you go.

STEP 6. Trim the corners, then turn the cover right side out. Hand or machine stitch the gap in the lining closed. Insert your pillow form and you're finished!

Read more...

Lacy camera case

>> Wednesday, July 28, 2010

I know I've been neglecting my blog when I find cobwebs on my camera tripod. Sorry to have been away so long! I had a tight illustration deadline that was keeping me busy and after a couple of weeks I tend to get out of the habit. As usual I can't show you the artwork until the project is published so I'll try to remember to show you later on.

Incidentally I've started getting a lot of "advertising" comments on my blog which means a comment that's really just a link to a business. Some of the businesses are.. um.. not family friendly.. and it can take ages to delete tons of these automated comments so I've had to add moderation to any comments on posts older than 2 weeks. This means that sometimes I don't see comments right away because the moderated comments only show up when I log in to write a new post. So sorry for delays answering any questions. I usually just reply on the same post where you left the comment/question so you can look for that, but you can also just email me directly, my email is there on the sidebar. Or include your email with the comment. As always comments are appreciated - it reminds me that people do actually read my blog!

So anyway, I was at a wedding with a friend recently who noticed my small handmade camera bag. I had made it years ago and it seems a little wonky to me, but she liked it and wanted me to make one for her. She has a typical bulky black leather/vinyl? bag and wanted a smaller one. It was good timing as lately she's been giving me lots of nice old sewing things, vintage transfer patterns, and bags of bias tape, trim, zippers and buttons, so it was a perfect chance to say thank you!

I love when people find old sewing things and ask me if I'd like them. "Are you sure you want this?" "If you don't want this stuff you can just give it to Goodwill.." I love that. They always seem surprised at how thrilled I am.
When I designed the camera bag for my friend I decide it was time to update my own and these are the results. It's a really nice thick soft wool that helps cushion the camera a bit. The colour didn't come out right in the photos and I can't seem to fix it. It's a bit more rich and warm.. Anyway I'm loving this teal blue lately. The floral print was actually a scrap from Jen Anisef leftover at one of the Workroom Trunk shows (thank you Jen!).
The inside is green seersucker. I like seersucker, there's something about it that makes me nostalgic, something comforting about the texture.

Then the outside is embellished with a bit of antique lace from the Sunday Market. I collect these things incessantly so I'm always happy when the right project comes along to use them. I just can't turn down a mason jar full of buttons or a bundle of vintage bias tape or lace.
The overall pattern is modelled on the wristlets I've been making lately with squared bottom corners. The wool is so thick that it was hard to sew with too many layers, so it worked out better having the lining fabric overlap the top to finish it. It kind of looks like a basket liner.

Anyway I now have a camera bag that I love!

Read more...

Dressing up

>> Thursday, June 03, 2010

This is my latest dress I've sewn. I made a few before this one but this is the first one I'm really happy with. When I started making my own dresses I made up my own patterns. I cut apart a simple dress I liked and used that as a starting point. I made changes to the shaping, added a waistband and neck band, moved the zipper and made the skirt more flared. I liked this new basic shape so much I made a few dresses with that design but it wasn't perfect so I wanted to try using a pattern.
I've found that vintage patterns have lots of good details that have helped me learn a lot about dress construction. I particularly love 1950s and early 1960s dresses with their pretty shaping, charming details and swishy skirts. Fortunately thanks to the glorious Mad Men, so does everyone else and there are lots of great vintage patterns on offer.

So I picked a basic vintage pattern (Simplicity 5022) to start creating my new dress pattern. I found it in an etsy shop called Sew This Patterns, here.
It had a basic fitted bodice which I adjusted for size. Vintage patterns don't need to be exactly the right size, if you're patient you can tweak the pattern to fit you perfectly. My vintage sewing books recommended making a muslin sample of the bodice using your pattern and then make adjustments until it fits perfectly. I actually did that. It's extra work to start with but it's worth it in the end. Once you've perfected the shaping on the sample you can go ahead and cut fearlessly into your fine fabrics!

So this dress has the bodice made from the pattern, combined with a 6-gore skirt pattern I created myself using instructions I found online. (Gores are just the separate panels that make up a skirt). Creating your own pattern means that you're using your own measurements and you can customize the skirt to fit you perfectly. I made my gore pattern flare a bit more so that the skirt would be wider. I do love a swishy skirt.

Then to complete the pattern I added some cap sleeves. I used the original dress I had taken apart as a starting point then made the sleeves a bit shorter.

The outer fabric for this dress is a white dotted swiss with blue floral clusters which is quite sheer. So I gave the dress a full white cotton lining. To do this, you basically sew up the dress twice, once in the outer fabric, then again in the lining fabric.

Sewing the lining to the outer fabric was not as easy as I expected. I sewed the lining to the neckline, turned it right side out and everything was fine. But when I sewed around the armholes I couldn't turn the dress right side out again. As Bradley explained, it was a topological problem and we couldn't figure out a solution. I ended up sewing around the armholes by hand. Any sewers out there with suggestions?
 The final touch for this dress was a handmade belt using a buckle kit. You can cover the buckle with any fabric you like. I also used grommets for the belt - another new skill!

Read more...

More rabbits

>> Friday, March 26, 2010

Notice Miss Sleepy Head is the one dozing in the background

I guess it might have something to do with Easter... but these little guys are turning up everywhere. Here they are hiding out in Bradley's knitting basket.

So there's a yellow one:
She's perfect for spring, with a cheerful mix of yellow prints and a yellow floral ribbon around her neck.

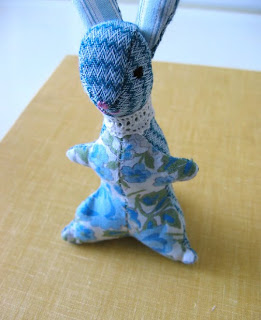
And there's a blue one:
This one has a retro style zigzag fabric combined with a blue vintage floral carefully salvaged from a 30s apron. I saved every scrap of fabric from that apron! Luckily it was torn or I wouldn't have been able to cut into it in the first place. She has a little crocheted neck warmer.*
*No I didn't crochet it myself, it's really just a scrap of trim.

Here's the back view:
These two have already been doing some crafting together:
But all three are besties. Hmm. I've never written that word before, it looks weird.
None of them have names because they're all leaving me to go to friends...

Read more...

  © Blogger template Simple n' Sweet by Ourblogtemplates.com 2009

Back to TOP