Playing house

>> Thursday, May 29, 2008

These lilies of the valley showed up in our backyard. They last very well if you pick them, and with only these three the kitchen smells lovely!

We took a long break after the main part of our kitchen renovation was done and for the past few weeks we haven't done much at all. But there are still lots of finishing details to do (you know, minor things like baseboards). Recently we've been starting to get back into it and I finally cleared out all the paint and tools that were in one corner. If you're pausing in your renovation I recommend it. It's worth trouping out to our shed to get a paintbrush in exchange for a (sort of) tidy kitchen again.
Today I filled the big bare wall in the eating nook area (we're nook people) with shelves from IKEA. They're just plain white ones, rather than something charming and countryish but they match the cabinets and when we sell the house someday I can leave them behind without any regrets.
As you probably know by now I love monochromatic schemes, and especially blue so I've put lots of blue/green things on the shelves.
Sometimes I feel self-conscious about blogging, I suddenly realize I'm showing you pictures of my kitchen shelves, which is kind of trivial. And I worry I'm boring you. But before I put the shelves up I was looking around on Flickr (how pretty is this) to see how other people had arranged their shelves. And I was trying to decide if I was happy with this style of shelf, or if we should take them back. So my point is I guess I find it helpful when other people post pictures of their kitchen shelves and a surprisingly large number of people do.

While I was looking I also found this brilliant idea for the shelves - if you had a cat. I love how Egyptian the orange cat at the top looks.

p.s. I really really want that couch too

Read more...

Yellow-breasted chat

>> Tuesday, May 27, 2008

After all this time I've decided it's finally time for a new header. Here's a detail of the pen & ink and watercolour illustration I made, which was inspired by my post on our illustration blog for the topic "yellow". Our talented Anette has been suggesting topics each week for our little group to post about to help us keep up with the blog.

Earlier this spring I saw a shrub with black berries on it which was very picturesque and have been meaning to add it into one of my illustrations sooner or later. Berry branches are always good backgrounds for bird illustrations since they like to eat them! I would have taken a picture of the shrub but I generally don't carry my camera around.

This bird is the yellow-breasted chat, I chose it because I liked the charming name and its bright yellow breast with light grey/brown feathers on the back.

Read more...

Weekender progress

>> Friday, May 23, 2008

I almost finished the weekender over the long weekend, there's just a few more finishing details left to do, so in the meantime I thought I would post some of the progress pictures. As you probably know by now (this is a very popular bag!), the first part of the pattern involves putting together the two main panels complete with large pockets, handles and piping. (I've made one addition at this stage, maybe you can guess?)

The second part is the zippered top panel, which has pockets attached at either end.
One thing this pattern taught me was how to neatly sew in a zipper, with folds on either side so that when it's closed the zipper is hidden. And doing it step-by-step is very easy and it looks nicely finished when done. I added a little bit of bias tape for a zipper pull.

I made a few additions to the pattern. One of my favourite (and the simplest) is inner pockets. I cut pockets with the same rounded shape as the rest of the bag and also cut out pieces of the thick canvas lining. Then rather than trying to hem the pocket, I added bias tape trim all the way around to finish the edges and attach the lining to the outside, then sewed the pocket in place.

I used magnetic snaps for the pocket closures. It's my first time using these, and it turns out it's really simple. Just snip two tiny cuts (with pointy embroidery-type scissors) for the tabs to go through, then the tabs fold in and hold each side of the magnetic snap in place. It helps that the fabric was a sturdy canvas, I guess if you were using something flimsier you would need to use interfacing. Another extra detail I added are loops on either side to attach a detachable (longer) strap. I sewed the loops in place just behind the side pockets so it looks tidy. Right now the bag is assembled but not quite ready for it's photo shoot so I'll show the finished bag in my next post.

Read more...

Picnicking

>> Monday, May 12, 2008

We had a busy weekend, hosting my family on Saturday for dinner, and hosting Bradley's family for Sunday dinner. And both evenings I was up until 1am working on artwork for the last of a series of five children's books I've been working on the past few weeks. It's not as bad as all that though because I've always been a night owl. I perk up around 6pm and get very energetic around 10pm and have to force myself to go to bed at a reasonable hour. Which I rarely do.

But I still managed to sneak out for a little thrift shopping Sunday afternoon although I felt oddly guilty. Lots of shops were closed and it was like "why aren't you at home have quality time with your mom? I hope you're not here picking up last minute flowers because you forgot it was mother's day" But it was worth it because I really liked what I found. This picnic basket (for $4.99) actually has a little table that fits inside it. Also good for separating things in the basket so less things get squished. I assume. The table cloth is a previously thrifted item but seems to belong with the basket.
When we go picnicking I like to take a pillow, and I've decided the charming pillowcase (below) will be perfect for that since it has a kind of woodland feel. I bought this from the friendly & talented Marnie at the Trunk sale (I also loved her "play capes" for children). The sale was lots of fun and as usual a source of lots of buying and swapping as well as selling.

note the bird ribbon. how can I resist anything with bird ribbon?

I also bought this cutlery roll from Marnie, which will also go in the basket.
My favourite part is the matching napkins.
And while I'm showing off the things I got at the trunk sale, I'm loving this spring scarf created by Dory who posts here. The colours came out a bit dark in the photo, the dark patches are actually navy blue corduroy.
It's warm but not too warm if you know what I mean. Also I like to see the fabrics that other people put together, it's like getting a little batch of someone else's stash.

Read more...

Amy Butler's Weekender... again.
Part one

>> Friday, May 09, 2008

Well this is my third attempt to make Amy Butler's Weekender and be happy with it. It's one of those things where you think the fabric you've picked is just perfect for a project and by the time you finish you're not so sure. And a few weeks later you can't stand it and wonder what you were thinking when you picked it in the first place. And you regret all that hard work you did to make something you don't really like.

But this bag is really great, it's such a perfect size and is just what you need for short trips (and good for cramming in extra stuff such as knitting and books) and is also great for a carry-on bag. And I wanted to start making one now well before I'm rushing to get ready for a trip so maybe I could do a really good job on it and not cut corners.

So the last weekender I made was a plaid upholstery fabric in a caramel kind of colour with pink piping. I'm not going to link back to it or anything because I grew to hate it. So I unpicked it recently (might as well re-use the zipper and cord) and decided to try again.
I bought some new Michael Miller fabric (pictured above) from Tonic Living but after a couple of days I wasn't sure about it for the bag although it may look great on our dining room chairs someday. I still like the fabric, I don't know why but I just didn't want it for the weekender bag anymore. This blue floral was my other choice, which I may still use someday. I bought a sample piece and it's nice and thick and has a kind of nautical freshness that I like.

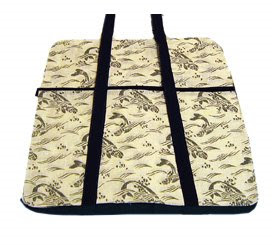
So in the end I decided on a fabric I already had in my stash, a thick white linen with a grey fish pattern on it that I think will look elegant although not extra practical since it has a white background. But there's all that detail and dots and things so maybe it will be ok. And the bottom is going to be dark grey twill which is very practical and the part that gets the most wear. But the main thing is I think it's really pretty and it inspired me to go ahead finally. I hope it works out, I took a lot of time thinking about fabric combinations and even Photoshopped new fabric choices onto a photo of the bag so I could try and picture it. This version looks like this:
The straps and piping are made with dark brown cotton (from the Workroom) and the base is dark grey twill. I'm going to line it with very sturdy cream coloured canvas material. I found a huge piece at Goodwill and thought it might be useful for something that really needed structure. Which this bag does. And as you know if you've tried, local shops look at you like you're crazy if you ask for Timtex. Last time I substituted buckram, but I forgot about that this time and just bought some fusible interfacing which is not as sturdy. (I used two strips of interfacing for each strap and they turned out well.) So in short I'm hoping the canvas lining will compensate. We'll see!

Read more...

Workroom trunk sale

>> Friday, May 02, 2008


I'm doing another trunk show at the workroom (in Toronto, 1340 Queen St. West, 12-5pm) this Sunday. It's a craft sale where everyone shows their wares in a suitcase. One new thing I've made for this show is a messenger bag with barkcloth on the flap. If I have any extra time I may try to finish a couple of needle books.
And I have to tell you, my craft "studio" was featured on Apartment Therapy! I was thrilled because I am a big fan of that site. I find it particularly inspiring because of the focus on small space decor, something I'm always working on. The quotes got lost in translation, so just a reminder I haven't suddenly acquired a craft's studio.. it's still the same front room that has our living room stuff (couch, tv) our dining room table and chairs, all the crafts storage and my two secretary desks with more crafts storage in one and all my illustration supplies in the other. And two rambunctious but lovable sock monkeys.

Read more...

Vintage nib pen

>> Thursday, May 01, 2008

A young rabbit: actual size

The trouble with ebay is sometimes you find things you never knew existed that you realize you absolutely need. My new favourite thing that just arrived in the mail today is a small vintage travel nib pen. Sometimes I do my illustrations with nib pens because I like the variation in line that you get as opposed to a regular pen. (In case you don't know, a nib pen is the kind you dip into ink and the nibs are removable. Before ball point pens were invented everyone used them.)

I thought the artist nib pen I bought at a store was just fine until the travel one arrived. It does very fine lines and the ink seems to last longer or flow better or something. I drew almost this entire rabbit with one dip of the nib. Also, the picture above is the actual size, but in the enlargement below you can see how much detail I could do.
zoom in of young rabbit

And even better I can take it with me on trips and maybe even sketch outdoors. Except that usually I prefer to draw from my imagination. I've always felt slightly guilty about this, as if it's lazy not to draw from life more often, but then I read this and it made me feel better.

p.s. I am currently illustrating a book about a rabbit... I'll show you as soon as it's published!

Read more...

  © Blogger template Simple n' Sweet by Ourblogtemplates.com 2009

Back to TOP