Illustration Friday - topic: Rain

>> Wednesday, June 28, 2006

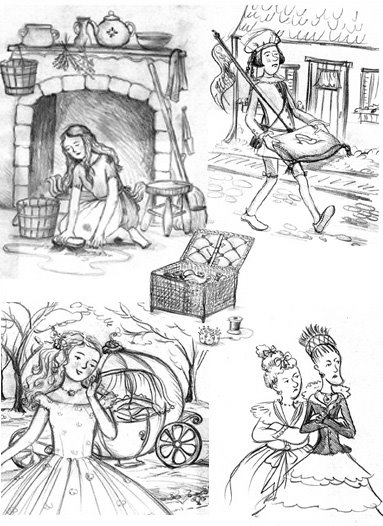
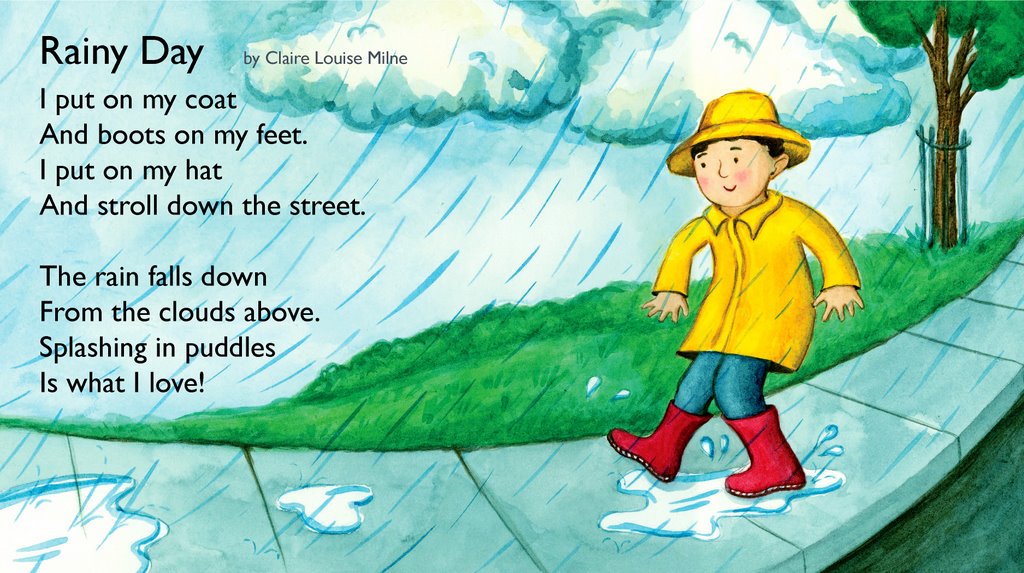
I had trouble sleeping last night and finally got up to work on an idea that was running through my head for the Illustration Friday topic: Rain. I did a sketch and wrote out a first draft of the text. Today I did this painting - it was for IF, but I had also wanted to create a sample for Babybug, one of my favourite children's magazines. I ended up revising the text and turning it into a poem. Even though it's so short it went through quite a few revisions. I read the manuscript requirements on the Babybug website and tweaked it to suit their specifications.

This illustration reminds me of my best tip for artists. I often work on illustrations and think they don't look great, and I'm tempted to give up and either start again or just get discouraged altogether. When I took a children's illustration course at OCAD I didn't always have a choice - the pictures were due whether or not I was happy with them. So I had to just keep going, try to refine and tweak the colours and work on the shading to improve the picture. And what I discovered is that almost all the time there would be a magic point where suddenly I would realize it was working. I would look at a picture that I didn't like and say, "actually it's not bad".

This painting was definitely one of those times. I kept working at it and it just seemed weak to me. I was pretty sure I would have to start again from scratch. But I kept going, and finally started to like it. I'm not saying it's perfect, but in the end I was quite pleased with the result. So that's my advice for anyone who feels their artwork isn't quite how they want it - just keep refining and you may be surprised.

As always you can click on the image to see it larger. Thanks for visiting!

Read more...

Turquoise tote tutorial

>> Monday, June 26, 2006

As requested, here is my tote tutorial. I made two purses this weekend using a repurposed skirt panel. It was a lined skirt that I tried wearing once, but decided I would like it better as a purse. I love the turquoise colour with the contrasting embroidery, but I don't usually wear such bright colours. I combined this fabric with a nubbly textured pale mint coloured linen. I love the contrast of the pale interior with the darker turquoise brightly embroidered outside.

So here's the tutorial part. First cut out your pieces, any size you like, two for the outer shell, and two for the lining, with extra pieces for the straps and pockets.Sew the two outer pieces together, with the right side facing in. Press the seams open. Then you square the corners, by opening up the bag, and making a triangle at the corner. This is the part people asked about, so I have a couple of pictures so it's really clear. Pin the corner triangle and sew across it.
Here is how it looks from the side:After you sew the corner, you can trim off the excess.
Alternatively you can fold the corners down, then sew them to the side seam or bottom seam. This is a lined bag so I could cut my corners, also this fabric doesn't fray easily. If you were making a light shopper and didn't line it, you could sew the corners down instead of trimming them off.

Once you turn the bag right way out, the corners look like this:
Of course, you need to do the same thing for the corners on the lining too.

The next step is to add the pockets before assembling the bag. I like to line the pockets, so I sew two squares together, leaving a little gap. I trim the corners to reduce bulk. Then I turn them right side out, and sew around the outside, which also sews the gap shut. Then I attach the pocket to the bag. This way I have a lined pocket without any unfinished edges that might fray.
Finished pocket sewn to the lining. You can add buttons and snaps here too if you like. Just a reminder, sew the pockets on before you assemble the bag!
Then I make the ties. The ends can be unfinished because they will be tucked in between the outside and the lining.
Pin the outside to the lining all around the top of the bag (with a .5" hem) then tuck in the handles and a loop for a clasp (optional) and add pins as necessary so that everything is securely in place. I usually have an inch or so of handle tucked inside.
Sew around the top and then remove the pins.
Reinforce the spots where the handles are tucked in. I usually make a square with an "x" in it.
Finally I added a button for the closure. As you can see in this picture, the fabric has a bit of a sheen which together with the embroidery adds a bit of elegance to the style of the bag.Finally, I have to mention that I have trouble putting things into my etsy shop - once I make things I get attached to them. So in this case I made two - the embroidery is different so this is definitely a one-of-a-kind item - and the second one is now in my shop!

Read more...

Brown linen bag

>> Friday, June 23, 2006

My Cinderella sketches are done, so I have some extra time now for crafts. I showed you the fabric I loved with the dotted lines..so now I've made it into a new bag. I wanted a soft one that will fold up small so I can take it with me on trips. I chose some brown linen to line it with, then realized it showed through the white fabric a bit. So I reversed the bag so that the white patterned fabric is now the lining. The picture up top shows the bag packed with stuff. The two front pockets are just right for my cell in one and ipod in the other. In particular please note that I am very spoiled and Bradley bought me this crafts magazine. I usually don't buy this one, but it had a good article about covering books and boxes with fabric and making portfolios, and also an interview with Amy Butler! I will show you some pictures in another post.

I really like how my new bag turned out and it was a great use-what-you-have project. The brown linen came from a shirt of Bradley's that was too large, so I cut out the main piece of fabric from the back panel. Then an extra piece to make the front pocket, with handsewn buttonholes and the buttons from the shirt. Then I used an extra piece for a sunglasses case. It's lined with the patterned white fabric, which you can hardly see unless you peek right inside. It's hard to see but I know it's there - so oh well. And I love love love the black vintage button I found in my collection to use as the fastener.
This is the bag without anything inside. It's very simple to make, just two squares sewn together, once in the lining fabric and again in the outer fabric, then sewn to each other. I added some skinny straps and a pocket on the outside. The bottom corners are squared to give it a bit of depth. The only tricky part was the buttonholes for the pocket - a handsewn buttonhole is just blanket stitching with thread (or twist if you have it!) but you have to take care to keep it even as you go around, and snugly spaced so there aren't any gaps and the fabric doesn't fray.
p.s. here are some samples of my completed Cinderella sketches...

Read more...

Cath Kidston moment

>> Tuesday, June 20, 2006

I have a wall in what I'm going to call my living room (in our studio apartment) that's been bothering me for ages. When I moved in I quickly tacked up a long skinny print I had, off to one side (I can't remember why) and a mirror sort of stranded in the big space leftover. This was after painting the whole room green. A green that on the paint chip looked light and subtle, but when painted on looked like a scary yellowy/green highlighter. Luckily it softened up considerably once it was dry and I quite liked how it turned out. But for some reason it bothered me on the living room wall part. It just was too much green wall all at once.

I was in Indigo recently leafing through some crafts books, and came across a great book by Cath Kidston about decorating with fabric. It had so many great ideas. One of which was to use fabric as artwork, by mounting it on a frame.

Then I was in Fabricland on the weekend and found a gorgeous tropical print. I love tropical prints, not all of them, but they have my favourite imagery, of leaves, flowers and sometimes birds or monkeys. My favourite ones usually have a bit of a limited palette, which this one did in blues, greens, and brown that I knew would work with my wall colour. There was also some brighter yellows in it, so it wouldn't make my wall colour look too bright in contrast.Then I found the perfect affordable frame by buying canvas stretchers at Curry's art store. You can pick any length for the sides that you want, and then combine them, so you can create any proportions you want. I had already measured out a portion of the fabric that I thought would look nice framed so I knew the exact size I wanted - 26" x 38". Large enough to fill the wall but not so large that it would make the space seem too small.

If you want to try it yourself, once you have the frame and fabric all you do is join the sides (they slot together, no need to glue/nail) and attach the fabric. I didn't have a staple gun, but if you do that's probably easiest, but I found that hammering in upholstery tacks worked perfectly. And ta da! Now I love the wall. I just have to decide what to make with the leftover fabric...

Read more...

Bits and Bobs

>> Friday, June 16, 2006

I've begun making needle books to put in the shop. I started with this one which I finished late last night and put into my etsy shop. It's already sold! But now I've worked out the pattern and I'm going to make lots more. I have so many great fabrics to use - for this one the embroidery on the front was inspired by the reproduction fabric in the lining.

In other news I did a wee bit of thrift shopping yesterday. I haven't done as much lately, but I loved this pillow case I found:
It's a nice sturdy 100% cotton, and I've decided to use it to make two little shoppers - the kind that tuck into a little pouch. Here's another picture of the pattern - I love the subtle colour scheme. And my other favourite new things are these lovely notebooks that Bradley bought for me. I've been eyeing both of them for a while now. They were from Indigo. I've started to use the circles one for my little sketches when I design my crafts things. I usually draw my ideas and label the sketch with the fabrics I'd like to use or general ideas. For example for bags, I work out what I want to put inside and where extra pockets should go etc.
I just have a thing for notebooks and I can't resist ones like these. The circles one even has a little pocket inside the front cover. I do actually use them every day, I'm always doing little sketches or jotting down lists. Once I get inspired I have to scribble it all down before I forget!

p.s. I ordered/reserved some of the pink flower lanterns from the Japanese Paper Store. They're going to call me when they arrive. I'm planning to use them to decorate the tree we're getting married under and the tent. So after they get used that one time I'll have extra ones left over. I'll mention them on my blog in case anyone is still wanting one at the end of September!

Read more...

New books

>> Thursday, June 15, 2006

I was very happy this week to receive a package of three printed books that I illustrated last year. It wasn't in the contract that I would receive printed books, but they agreed to send me a copy of each anyway. I really love seeing the published books. So I've been busy this week updating my online portfolios: www.portfolios.com/claire and www.childrensillustrators.com/clairelmilne.

The stories were really funny and charming, the titles are Fruit from Space, The Land of the Peppertoes, and Food Fight. I think Food Fight was my favourite, it's very funny. In that story the dairy decide it isn't fair that they are left at the back of the store, and try to take over the front. Of course the produce puts up a fight!
It's a funny thing - when I'm swamped with work and have lots of samples I could put into the portfolios I generally don't have time to do it. But when things slow down, it's because I'm not busy with new work. Right now I seem to have a nice balance for once, I'm busy with Cinderella but I still had time to do some updating.

Ok back to work on Cinderella...

Read more...

WIP- Peppermint twist sweater

>> Saturday, June 10, 2006

I've finished the front of my sweater! Valentina guessed right - it's the Peppermint Twist pattern from the Stitch n' Bitch book. The one in the book is more pinks with white so it looks more like a peppermint stick candy, with the twisting stripes - hence the name. For aforementioned reasons mine has a lot more orange in it, and brown. I do like how the colours turned out in the end though. The sleeves are going to be all light pink - as the pattern suggests - partly because that's what I have left to work with.

I took the picture at this angle so you can get the sense of how much I've accomplished - stripes as far as the eye can see. It looks huge, but it's actually the size medium with an extra inch of length. The one in the picture seemed a little short, I don't like having to tug my shirts down all the time to avoid the bare midriff look. Although if I looked like the model in the book maybe I'd be ok with it. I was relieved to find that I had enough of each colour to do the back (which is exactly the same) - because I don't think I could create the same dye colours over again. (p.s. I'm joining in with a WIP post after reading Blair's lovely blog today.)

In illustration news I'm now working on sketches for Cinderella - I love it! This is exactly what I hoped I'd be doing some day. They're quite rough at the moment but I'll give you a peek:In this version, Cinderella sews her own dress for the ball, but the mean stepsisters ruin it. Which of course is when her fairy godmother appears. As you might imagine I loved sketching her old-fashioned sewing box - it's a spot illustration on the page that faces the page with Cinderella in her homemade dress.

In etsy shop news I've added another apple pincushion. I'm also planning to make some needle books soon.

Read more...

Lovely swap from Craftapalooza

>> Friday, June 09, 2006

Everywhere I went yesterday I was looking at bicycles...but unfortunately we haven't found Brodie, despite wild hopes we would see him at a bike shop somewhere.

I did however happen to see this lovely lantern at the Japanese Paper Place while wandering around. They didn't have one in stock but they may be getting more. I would love it for my apartment. It would also be perfect for the wedding. Maybe I'll call and see if I can get a few.

In other happier news I also received a lovely swap package from Nicole at Craftapalooza. Of course it came with extra surprises - such as this pretty red patterned fabric:You can see the fabric close up in this picture. And next to it are little embroidered felt flower covered magnets. These flowers are now on my fridge outshining all our plastic fruit, etc.
The package came bundled up in a little brown paper bag, tied with this lovely ribbon. I love it! See also the cute vintage buttons:
And finally, the main attraction! A tape measure covered with beautiful felt flower decoration. I love this the best, and I'm already using it - that is now that I've remembered it's actually something useful not just a beautiful little thing. Thank you so much Nicole!
p.s. the pincushion challenge gallery is up!

Read more...

Have you seen Brodie?

>> Wednesday, June 07, 2006

We had a bad evening today, after a 30 minute shopping trip along Bloor we came back to collect Bradley's bike and it was gone! Someone stole his bike and left the chewed up lock behind. It was parked just north of Bloor St. on Park Rd. (just east of Yonge). At first we couldn't believe it and just stared at the shreds of the lock on the ground.

Bradley was incredibly upset - he loves that bike so much. It's a bright green Brodie Quantum, 19" bike, serial number: H0J 10729. If you see Brodie please let us know! I know it's a long shot - most of my readers I suspect are crafters, not bike shop owners but you never know...

Read more...

Knitting a sweater

>> Sunday, June 04, 2006

I learned to knit when I was quite little, and over the years took on some quite ambitious projects. I knitted clothes for my stuffed animals, a large afghan blanket in a fancy pattern, and even a complicated aran sweater, with a few varieties of cables in a medium blue colour. I learned from this that aran sweaters are probably best in the classic cream colour, or maybe dark brown or moss green, and also that they aren't very flattering when knit up a few sizes too large.

I stopped knitting for several years (discouraged possibly by the huge blue aran sweater), but now I've been knitting again for years and I still haven't made another sweater. So I decided recently to take the bull by the horns and make one. Of course I'm hoping it will turn out to be something cute that I might actually like to wear, but just in case I haven't invested much. I found this bag of yarn for $5 at our family yard sale, it's 100% wool but superwash so I can wash it and it won't felt. It's also nice and soft, not too bulky, and there were sixteen 50 gram balls - plenty for a sweater.
I decided that the pale pink was a little bland, so I embarked on a big kool-aid dyeing evening. I've done this before with great success and I had some packets left. All you do is wind the yarn into a loose loop tied at each end and put it in the pot with some dissolved kool-aid powder and a bit of salt. Then simmer until the water runs clear.
Some people suggest you need vinegar, but I haven't found any need for it. I've washed kool-aid-dyed-wool in hot water and the colour didn't run. Also I couldn't find sugar-free kool-aid but the kind with sugar seems to work fine. The only thing I would suggest is to make sure you soak the yarn before dyeing - wash it with a little bit of dishwashing soap first - and that way the dyeing will be less blotchy. And incidentally, when you use the ice blue powder the water doesn't quite end up clear, it ends up white, but that's ok.
You can mix and match colours, and of course add more packets for deeper colour. The colours are nice and saturated as long as it's wool. Cotton doesn't absorb the dye as well, and ends up in pastel shades. Once the dye bath is clear the colour seems to be set in, I rinse the yarn but the water runs clear right away.
It turned out that kool-aid was on sale for $1 for 6 packets, which is really good, but unfortunately they seem to have changed the dyes. My old strawberry was bright pink, and the new one seemed more orange. So instead of a bunch of pink/purples, I ended up with lots of varieties of orange and a dark brown. I did have two fuschia skeins from the old kool-aid I had lying around, and mixed with the orange and pale pink I actually like the combination. I made this swatch:So now I'm ready to go - I've picked out a sweater pattern from one of my books. It's a popular book and the swatch kind of gives it away - so maybe you can guess which sweater pattern I chose?

Read more...

Illustration Friday - topic: cake

>> Thursday, June 01, 2006

* click on the image to see larger *

Well this is really last minute! But I wanted to do the topic "cake" mostly because I love cake, but I also had an idea I liked for this topic. It's from a story I've wanted to illustrate ever since I found the book in my local library when I was little. It's a fairytale story by J.R.R. Tolkien called Smith of Wootton Major.

The scene I've illustrated is a special midwinter party for twenty-four children that involves a wonderful cake. This particular cake is iced to look like a snowy mountain with trees and topped with a fairy. There are lots of details so it's best to see it larger, but here's a detail:I would have liked more time but I just finished the final art for Puss in Boots yesterday, so I just had part of today to work on it. But better late than never!

Read more...

McCall's Step-by-step Sewing Book

This was a recent thrift shopping find. I got excited when I saw it, and I even got a discount from the 75 cent cover price - it was 49 cents.

I just love the cover, I love the pose with the man pinning her skirt for her in those great Cary Grant style high-waisted trousers. (With a haircut you could set your watch to.) And if you look at it from a modern point of view, the decor style is still really nice. Her sewing room has great storage drawers and compartments, everything light and airy, with that beautiful white featherweight Singer on her handy folding table. And I also love the grey swivel chair - what a great design. Not sure about her dress fabric though. (You can click on the picture to see it larger).

I actually have a white vintage featherweight myself, but I'm so used to my really old black Singer I haven't adjusted to the featherweight yet. It may need a bit of a tune-up - an oiling or belt adjustment or something - despite the fact that it seems to be in perfect condition - almost new. When it arrived (I bought it on Ebay) I felt like someone could have just popped back to 1970 to buy it for me. Even the green carrying box it came in was perfect.

The inside of this book is great too - there are lots of illustrations, and colour photographs, but mostly just close-ups of sewing techniques. I think it will be very handy when I try my first dress pattern. I haven't made my own clothes from a pattern yet, but I'd really like to try. I also like that this old book has descriptions that are relevant to my old sewing machine and attachments. Most contemporary books assume you have a zigzag sewing machine at least, and usually a few other functions as well.

That being said I do use new sewing books as well, my girlfriend gave me DK's The Complete Book of Sewing for my birthday and it's so useful. I used it last night to figure out how to sew cuffs on some jeans I was turning into knee length shorts/capris. It's actually quite easy, but I didn't quite know how to do it properly. Now I do and they turned out really well!

Read more...

  © Blogger template Simple n' Sweet by Ourblogtemplates.com 2009

Back to TOP