Purple plum spiral handspun yarn

>> Monday, January 25, 2010


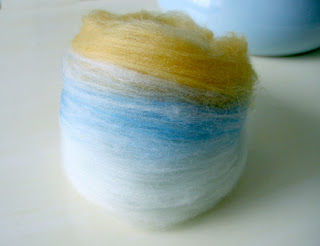
This is a yarn I made a little while ago. I had to hold onto it for a bit but it's up for sale in my shop now. I spun it with some roving that was included with the spindle (pictured above). I wish I knew what the fibre was, because it was lovely to spin. I dyed it with a variety of purples then pre-drafted it into a nice soft big ball of roving:

This is the finished single:

Just to make it come out even I Andean plied it:

I know it looks a little crazy and maybe Andean plying is meant for smaller amounts of yarn. I do like plying with bobbins (I'm going to show how I do that soon), if I have enough yarn, but sometimes when there's just 2 ounces or so I'd rather Andean ply and not worry about having leftover singles. I find it works really well, as long as the single isn't too fine, which can cause tangles.

One new technique I tried while plying was adding little coils/spirals into the yarn by pushing one strand up while the other strand is held in place. Here's a close up so you can see the spirals:
 
The final effect was subtle, but I thought it turned out well, quite pretty.

Read more...

Sailboat batts

>> Thursday, January 21, 2010


So here's my next batch of batts. I had trouble coming up with the right colour combination but I love how they turned out in the end. I think I have about 100g.


First of all I had a medium bright blue braid that was a bit dull. Also it was kind of compacted and dense so it was going to be hard to draft. The best solution for this is to divide the roving lengthwise a few times then pre-draft if you need to. But putting compacted fibre through a drum carder will fluff it right back up (you do have to pick it apart a bit).

So I turned that blue braid into the first batt. Then I had a pale minty green braid that I turned into the second batt. I had over-dyed some of the blue with dark brown but when I tried blending the three colours, the results were disappointing.

So I picked a small ball of yellow roving that I had on hand and blended that with the medium blue and pale minty blue batts. Adding yellow to the bright blue was a great way to make it harmonize with the minty (more turquoise) blue. It looks kind of white in the photo... it's just so pale the little tint of colour doesn't show up very well.

The fibre I used for these batts was all merino. I'm starting to be able to tell the difference between fibres. Corriedale  in a braid sometimes feels just as soft as merino. But after putting batches of each through the drum carder I can feel that the merino is softer, and also tends to "cling" a bit more. It's hard to describe but I think it's just that the fibres are more delicate. I find I have to be a bit gentler so as to prevent tangles - just turn the handle of the drum carder more slowly and put less fibre in at a time.


I'm calling this colourway Sailboat. I'm not sure why I keep naming my fibre when I'm planning to spin it myself but I just like to do it...

Read more...

Drum carding

>> Wednesday, January 20, 2010


the original hot pink spun on the left, the new blend on the right

I've now tried and instantly become addicted to drum carding. On Saturday I rented the Louet junior drum carder from Lettuce Knit and so far I've made lots of blended batts and reached the point where I am now rummaging around to find more things to card. It's like that.

Batts resulting from the hot pink blended with dark brown, and the hot pink blended with pale pink

So just to show you how it works, and how fun it is, I'll show you my main project. I had a 1/2 pound bag of very vibrant hot pink corriedale top that was languishing around since I didn't really like the colour anymore. It was just too bright. So I dyed some of it dark purple/brown, then blended that with the original hot pink to soften the colour. Then I blended some of the original hot pink with some very pale pink.

 Then I blended the resulting dark pink and medium pink with more of the pale pink while keeping the stripes fairly distinct.

I find I use the dog brush a lot while drum carding. I use it to remove the batts with gentle short strokes so that little strands aren't left behind. You can also turn it around and use it to burnish the batt as you would with a burnishing brush. It smooths the batt down and you can make a denser batt.

 The resulting batt - rolled up


The batts aren't too wide with the junior drum carder, so I've found the best way to handle the batts once they're done is to draft them out a little bit, then wind them up into a ball. Drafting out a bit helps straighten out any last little bits of fibre that aren't perfectly aligned and makes the batts easy to spin.

Now I have a big basket of rolled up batts ready to spin. And this is the resulting yarn:

I really like the look of it, I guess you would call it a marled yarn. I don't know what I'm going to make with it though. I should be spinning with a project in mind shouldn't I? Oh well I don't really mind having extra handspun around... although I will probably try to find a project so that I can decide the best way to ply the yarn to get the weight and yardage I'll need. But for now I just love carding. And spinning.

Read more...

Dyeing merino

>> Tuesday, January 19, 2010

The last few days have been all about wool. I've done some more dyeing with Kool-Aid. I used four plain white merino 50g braids that I bought at Lettuce Knit recently.

This one is called Koi pond:


This one is called Lilac:

and lastly this one is Rusty Ship, because it reminds me of rust on an old ship:

I did two braids in this colourway (100g) so that I would have enough yarn to finish a project. I can't wait to spin these! After spinning plain brown for so long, it's so fun to be spinning colours again. I just finished spinning this corriedale braid from Kristyn of Pleasurecraft:

into this:

Spinning 2-ply is my favourite now. I think this skein is Sport weight (around 14 WPI).

Today I've been doing some drum carding, I rented the Louet Junior drum carder from Lettuce Knit. I'll show that next!

Read more...

Sweethaven - dark turquoise doily bag

>> Monday, January 18, 2010


Ok, so bags. I can't stop making them. Possibly in some kind of endless quest to make the perfect one. I'm not sure. But this is my latest design and I'm kind of excited about it.

I'm calling it the Sweethaven bag (I love the movie Popeye.. especially the soundtrack by Harry Nilsson). The idea is that you're out and about, you have all this stuff that you want to have with you, and this bag looks after everything and makes you feel like you have a little comforting haven of organization as you go.

The secret is pockets.

There are two large interior pockets on each side that go the whole width of the bag. I divided the pockets so that they are just the right size to fit sunglasses, a pen, a water bottle etc. Then the back of the bag also has a large pocket that could hold a paperback book.

And with upholstery weight fabric, piping and top-stitching the bag has a lot of structure. All the pockets are lined which gives it even more layers.

I used a wool plaid on the front and back, and the back pocket is tweedy brown wool. The sides have a blue panel, then piping, then brown corduroy on the bottom and outside of the straps.

 The front is dark teal/turquoise corduroy with an appliqued doily.

Look at all the detail on the doily! I love the pineapple motif. Vintage doilies kind of fascinate me. Someone spent ages making it, and no one really wants them these days to actually put under vases or whatever. But I love the lacy look and buy them because they're pretty.

So now I'd like to ask, what do you look for in a bag?

Read more...

Men's handspun socks

>> Thursday, January 14, 2010


So as I mentioned before, I was frantically spinning before the holidays to make Bradley some handspun, handknit socks for Christmas. I had bought a 1/2 pound bag of roving from Romni, thinking that I would have plenty for maybe 2 pairs. Or at least a pair for him and a smaller pair for me. Or something like that.

Anyway what happened is it took forever to spin a 1/2 pound bag, and I ended up with just one pair of socks and a tiny batch of roving and a tiny ball of yarn left over. The big thing I learned is that I bought a bag of roving, and realized later that it was actually roving, not the lovely smooth combed top that is often sold as roving even though it's really top. I'd heard about this distinction but I didn't really know what it meant until I tried spinning with the roving.

The difference seemed to be that the fibres were shorter, with some tufty bits that were fine as it gave the yarn a tweedy look, but also lots and lots of vegetable matter (vm). In case you don't spin, this is basically little bits of dried grass, twigs and bits of burrs that the animals have gotten caught up in their coats. Some people put covers on their sheep to avoid this, but there's still always some in there. Anyway I was picking out vm while spinning, then while winding onto bobbins, then while plying, then while knitting, then after washing the socks. Kind of tiresome.

However, I'm not complaining about what I was sold, because I did get 1/2 pound of merino for only $15. Which is a very good price for that much soft merino. And now I fully appreciate the difference between roving and top.

The other thing I learned is that this roving seemed to require a different kind of spinning. The short fibres didn't hold together in the same way so I was letting twist up into the fibre source which is more of a woolen method of spinning than worsted. (Worsted is a way of spinning so that the fibres align and it creates a smooth yarn. With woolen spinning the fibres criss-cross and this creates a fuzzier, airy yarn that is very warm. Not to be confused with worsted weight yarn, which is a medium thickness of yarn.)

After letting twist up into the fibre, it was like pulling the yarn out, and by doing it at the right rate given how fast the spindle is spinning, you can make an evenly spun yarn. I found it a bit lumpy but I ended up doing a 3-ply so it averaged out a bit and was fine. 3-ply also creates a rounder looking yarn, as opposed to the beaded look of a 2-ply.

So doing a (non-navajo) 3-ply was the next new thing I was trying. I wound the yarn onto bobbins after spinning a full spindle, then used a tip from a commenter (thank you Rachel) to create a lazy kate using a cardboard box and some knitting needles. (Another tip is that you can just ply off spindles if you have enough of them to do that.)

Then I plied the yarn until I was left with some leftover singles (it's hard to wind 3 bobbins of singles and have them come out even). I realized I could wind a leftover single back onto the spindle and spin a bit more. And basically drive myself crazy trying to make it come out even. Which in the end I practically did. Not that I recommend being that obsessive it... suffice to say I was winding back and forth several times.

So after all this spinning (and washing and drying the yarn) I wanted to make the socks using the same nice sock pattern I had used for mine (pictured at the top on the left). This is how I adapted the pattern for men's socks:
  • Larger needle: US size 7 
  • worked 15 rounds of ribbing instead of 10
  • continued leg in stockinette for 45 rounds instead of 36
  • at the toe decrease once there were 8/8/10 stitches stopped doing the all knit rounds
  • grafted the toe at 5/5/10 stitches
You can vary these adaptations to fit any specific man's foot, ie. adjust the length of the sock, the length of the foot and how quickly you decrease at the end. Thank you for such a great simple sock pattern Kit Zerbe!

As with my socks, knit with lambspride worsted yarn, after a wash in the washing machine, they felt a tiny bit which improves them a lot. They end up snugger, denser and warmer.

And believe it or not it was worth all the work, Bradley loves his socks so much. They fit perfectly and are apparently the warmest socks ever.

Read more...

New look

>> Wednesday, January 13, 2010

-:- -:- -:- -:- -:- -:- -:- -:- -:- -:- -:- -:- -:- -:- -:- -:- -:- -:- -:- -:- -:-
There is a second column on the sidebar with room for sponsors. If you'd like to sponsor the Needle Book blog, just email me at needlebook(at)clairelouisemilne.com. The introductory rate for a picture and link the size of the Needle Book image is only $25/month. I am able to design an ad for you for reasonable rates, just ask if you need help. If you own a fabric or wool shop I'm happy to trade!
-:- -:- -:- -:- -:- -:- -:- -:- -:- -:- -:- -:- -:- -:- -:- -:- -:- -:- -:- -:- -:-

So the first new thing, as you will have noticed (and thank you so much for the nice comments about it) is the new look for the needle book blog! It really wasn't as much of a headache as I thought it would be. It's very easy to find blog templates for free online (there's a credit for mine at the bottom of the page) and you can just update the template with your own materials, such as the picture at the top of the page.

I was using html to make updates to my blog (I took a course at George Brown ages ago that got me started). But with the new Layouts version of Blogger so many things are automated. But you can still edit the html if you want to fine-tune something.

After I uploaded my new template (always save your old one just in case!) I changed the image at the top, made the whole thing narrower, removed formatting I didn't want such as underlining on links and titles, changed some of the fonts and colours, then added the elements I wanted on the sidebar. I also put back the Navbar at the top since since I figure Blogger is free and I do actually use it quite often. And luckily the colours actually match.

In case you're interested (anyone like me that's been blogging for ages without upgrading to Layouts) here are the new features I love:
  • when you click on my blog titles there is now a link to that specific post
  • I can easily add widgets from other websites, such as the RSS feed button
  • it's easier to move elements around on your blog such as sidebar lists and graphics
  • a blog roll is so much easier, just type in the url and Blogger adds the name of the blog, the link, alphabetizes it, and indicates when there are new posts (saves going to a reader to see updates)
  • you longer need to upload extra images (such as your header or images on the sidebar) elsewhere on the web then link to them - now you can upload those images directly to Blogger
  • there are more formatting options when you write posts
  • and last but not least I finally have the "older posts" links at the bottom of the page!
There's probably more things that I'm forgetting, but in any case it turns out the work to upgrade was well worth it.

I also have a second column on the sidebar with room for sponsors. If you'd like to sponsor the Needle Book blog, just email me. The prices are low as I'm just trying it out, and if you own a fabric or wool shop I'm happy to trade!

    Read more...

    Bear with me

    >> Tuesday, January 05, 2010

    My illustration for our Fall IFK promo

    Ok, so I started blogging a long time ago, and I need to update my blog so that it can have new features. I can't even figure out how to add the "older posts" link at the bottom. So I'm going to update my blog to the new settings, but I will lose all my formatting - things on the sidebar, the header image etc. I'm going to fix all that but it may look like a mess for a bit!

    p.s. lots of new things are heading into my etsy shop: wristlets, and soon some needle books and brooches!

    Read more...

    Happy New Year!

    >> Sunday, January 03, 2010

    january

    I did a little review of my blog photos from last year, it was nice to actually feel like we have accomplished some big things. In April we closed on the new house and started to go back and forth between houses doing painting etc. and while I didn't have any blog posts for April, I did find a few pictures of how we were living back then. It's a reminder to appreciate all we have, including a proper bed, no more mattress on the floor!

    Thank you to all my needle book blog readers, thanks for your visits and comments and coming out to see me at shows. I can't always reply to every comment but I always appreciate hearing from you. Hope you all have a wonderful 2010.
    february

    march

    april

    may

    june

    july

    august

    september

    october

    november

    december

    Read more...

      © Blogger template Simple n' Sweet by Ourblogtemplates.com 2009

    Back to TOP