Pincushion challenge - flowers

>> Monday, July 31, 2006

As promised here is my pincushion for the Pincushion challenge - just in time since it's the last day. The cylinder style pincushion seems to be quite popular - I've been wanting to make one for some time and this is my first one. It's a good shape to decorate with embroidery and appliqué. I have been inspired of course by the beautiful pincushions made by Bella Dia - so talented! and this lovely cake pincushion made by Sweet Pea. I didn't mean to copy Sweet Pea - but I think mine kind of looks like a cake too. It feels like a nice fat cupcake.

I made my pattern by cutting a rectangle, then tracing the circle it would make with a 1/4" seam allowance. The top is made from pale pink wool felt and the bottom is made from dark red wool felt. The side is dark pink cotton fabric - I used two layers of fabric so it would be thicker. It was also the perfect opportunity to use my charming elephant flower ribbon:The ribbon has flowers in white and dark green on a red background so I used those colours to decorate the top. The flowers and leaves are made from wool felt with pink embroidery floss French knots in the centre of each one.
I added a small button at the top and bottom so that I could pull in the centres and make the shape more stable The filling is just light poly filla and it was curving out at the bottom and the pincushion was going to be wobbly. Maybe next time I should add some cardboard at the bottom.I can't wait to see all the Pincushion challenge creations this month!

Read more...

Tropical print blue green weekender

>> Sunday, July 30, 2006

I haven't posted in a while - I've been busy with my main project which was making another Amy Butler weekender bag in a new fabric. I do like the other one but I got inspired imagining the bag in this fabric. I wanted to get it done soon because I had my heart set on having this cute bag for my carry-on for our honeymoon in September. Once I had used the pattern the first time I realized I could do it with less fabric than the pattern called for as long as I cut out the pieces carefully. Which means I could make it with some leftover fabric from my fabric as wall art.

A lot of people love this bag and want to make it, so here are some more tips:

  • you can find a place to buy the pattern using this page as a jump off point
  • I didn't have trouble with sewing through thick layers but I have an old Singer lockstitch machine and they are work horses. Very good at handling heavy sewing. The old sturdy Singers did the whole family's household sewing for many years
  • the second time is easier - you learn quite a bit the first time round
  • if you want to align the design on the fabric, cut out the main panels first, then align the fabric for the large pockets
  • don't make extra cuts in the fabric until you know you have enough fabric for all the pieces - you may need a long strip later on
  • chalk outlines from the patterns before cutting out to make sure you have enough
  • if you don't quite have enough fabric you can cut the top part in two pieces and attach them - I had to do that for one half of the top & side pieces and it's not very noticeable
  • you can add pockets to the lining before you assemble it - I added a zippered pocket on one side for papers etc.
  • attaching the lining can be time consuming - don't try skipping the tacking-it-in-place step though or it won't look as good at the end - it will be floppy instead of held in place
The two sides of my version are different. I did align the pattern - it is more trouble but I think it was worth it.
This is the bag from one side. The piping is a dark turquoise knit fabric and the handles are very dark brown corduroy.
The lining is a pale turquoise.
This is what the inside looks like - my zippered pocket is one addition I made that's not in the pattern. When I tacked the bottom part of the lining in place I found it easier to do with the bag inside out.
A view of the bottom:
And finally, a word about copyright issues. I'm passing this information on because it's something I learned more about recently. It clearly states on this pattern that you can't sell things made with Amy Butler patterns. And in some cases you will find out that this restriction applies to free online patterns too, and it may not always be clearly indicated on the pattern.

I found out to my chagrin that I shouldn't have sold my knitted bag without permission from the publisher of the pattern. I had an anonymous comment that drew my attention to this, so I wrote to Yarn magazine and was given permission for that one bag. I was quite worried about this so I thought I'd share the information on my blog so others can avoid making this mistake. The general idea is that while you own a copy of the pattern you don't own the design. There is an article about this at www.knitty.com.

While looking up copyright rules I also learned that the same restrictions can even apply to selling things made with copyrighted fabric! I found a good discussion of the issue at www.dioramarama.com so I won't go over it again. Needless to say I'm no expert so I probably won't be able to answer further questions about this - but searching on the internet will turn up lots of articles for those of you who sell your crafts and are interested.

I also recently learned that you aren't allowed to link to your shop from your Flickr pictures according to their rules. I discovered this after reading a discussion in one of the groups dedicated to hand crafted shop goods for sale. You can only have a link to your shop from your profile. If you have shop links on your pictures they can kick you out. It's too bad because I see so many wonderful crafts on Flickr and I personally love the opportunity to have the link handy and scoop some of them up in people's etsy shops!

So that's what I've been up to. Thanks so much to everyone for all the nice comments about my Amy Butler bag. This one is really worth the work. Coming up next: my flower pincushion for the pincushion challenge!

Read more...

Weekender sneak peek

>> Tuesday, July 25, 2006

Well it's not really a peek as such since the outside is finished. I still have the lining to do, and I'm planning on adding some pockets in there. I made a lining from the dark pink but I thought it was a bit too strong a colour so I've decided to switch to a light pink lining.

Tips in case you want to make one yourself
Timtex vs. Buckram
As you can see from the picture, the bag is the right shape and it stands up like that without anything inside. So it looks like the buckram works fine as a substitution for Timtex. I don't know exactly what Timtex is like, but it's probably more difficult to work with than the buckram. There were comments in the pattern such as "the Timtex may be difficult to fold" etc. and the buckram was fine. Also I didn't break any needles and I even forgot to switch to the heavy jeans needle before I started. Of course I slowed down a bit when going over the part where the cording comes out into the seams - where it was quite thick - but overall it just wasn't that difficult.

Materials

  • In case you want to make it yourself, I'll mention that I used much less fabric than the pattern called for. I do tend to snug up the pattern pieces so as not to waste fabric because there's really no reason to have gaps between the pieces you cut out.
  • I used two spools of thread and that included a reasonable amount of ripping out and resewing.
  • It was fine to use fusable interfacing whereas the pattern calls for non-fusable. For the bottom of the bag you insert an extra layer of Timtex (or in my case buckram) between the interfacing and outer fabric. So at that point you don't fuse the interfacing so as to leave a gap to insert the piece of Timtex. But after it was all assembled I put an iron inside the bag (which is quite roomy) and ironed the bottom to fuse the interfacing.
  • For the zipper of course you can use a separating zipper (instead of non-separating which can be hard to find) and just stitch over the end part.
  • For the cording it tells you to join up all the strips of fabric to cover your cording. But you only need four separate pieces of cording: one strip to go around each face of the bag and two smaller strips to trim the large pockets. So you don't really need to make one long piece of cording. As I mentioned before I used boot laces that were nice and round and 1/4"
Overall
This is a great pattern. I learned a lot while making it - such as the proper way to sew in a zipper and get those little flaps that cover it. As long as you take your time and just think about one step at a time it's not that difficult - I found the instructions and diagrams to be quite clear. Probably you should have some sewing experience. And finally it's bigger than I expected but we measured and checked the airline specs and it's just under the maximum size for carry-on luggage. Which is what I wanted it for. Overall I think mine is cute but not as nice as my birdy inspiration so I've been musing about making another one sometime...

Read more...

Now you really know I'm crazy

>> Friday, July 21, 2006

I made this crocheted hat a long time ago - it was one of my first posts ever - and I've been meaning to make a matching scarf for it for ages. I had the matching wool tucked away ready for when the right pattern came along. The main part is a shell stitch and I picked up stitches around the brim and knitted the bottom part.

So while browsing through the new Stitch 'N Bitch Crochet: The Happy Hooker book I found the perfect scarf pattern - a scallopy scarf called the "one-skein scarf". So yes, even though it's been sweltering hot here I've been crocheting a scarf. While on the subject I would like to mention that I visited knitomatic (my favourite knitting store) recently to pick up some crafts supplies Hayley was giving away. It was one of those days that's 34 degrees and feels like 40. And while we were chatting Hayley was busy knitting away. So I'm not alone! p.s. thank you Hayley for the felt.

This pattern is so pretty and very simple. It's knitted sideways. I like designing my own things, but it's nice following a pattern sometimes because you know ahead of time how much yarn you'll need. I finished the scarf in two days.
Here's a detail:My WIP is the weekender bag and it took me a few hours last night cutting out the outside, lining and interfacing pieces. I still have the timtex pieces to do. That's right I still haven't even cut everything out! I do finally have all the ingredients though. I had more trouble than I expected finding the 1/4" cording since they had run out at Fabricland and a couple of sewing stores I tried gave me that "as if" look. You know when you ask for something and they look at you as if you'd asked for a cordless drill. I thought the dollar stores might have it - it's really just cotton rope but they only had nylon rope. Then I found some really long cotton bootlaces that looked just like the cord and came in 1/4"! Perfect.

Read more...

Summer tote

>> Wednesday, July 19, 2006

I think I'm procrastinating on the weekender bag...it does seem like a lot of work. The pattern seems to be quite clearly written with lots of details and if I work my way through step-by-step it should be fine. But there are a lot of steps and when you open up the big sheet covered with text and diagrams it kind of looks more like the instructions for constructing a rocket than a bag.

I almost have everything I need now though, so once I pick up the cording and thread tomorrow I'm going to get started. Really. Meanwhile I've made a tote with leftover fabric from my pillows. Which has gone right into my shop. (by the way I don't mean to sound like I'm constantly promoting my shop - but I can't stop making things and I'm running out of room... I'll show you a picture sometime but I have baskets and shelves and tins of fabric and ribbon and buttons tucked all over the place.) I even parted with a nice little vintage button for the clasp:
I like having white for bag linings - it has a nice summery airy look, and it's easier to find your things. Of course that means you have to wash it once in a while but as you know I prewashed the fabric so that would be no problem.
In illustration news I've almost finished the paintings for Cinderella!

Read more...

Summer pillows

>> Tuesday, July 18, 2006

Another small accomplishment! We have a neutral cream-coloured couch from IKEA - in the Karlanda style. It has three seats and an add-on at the end so it makes an "L" shape. And until recently it was covered with a real mish-mash of cushions.

I had made a set of four cushions at my old apartment with coordinating fabrics. Two of them had fabric with bamboo, palm trees and monkeys on it, and the other two were striped ones in the same green and yellow and red colours. I think it was a pretty charming set. Then later on I made two red cushions with lots of flowers and leaves in red, golden yellow and olive green colours. These had olive green cord trim. Then recently I made a simplified log cabin pillow that didn't go with anything. So altogether we had seven pillows on the couch. Also, not to be gross but I hadn't made the earlier pillows with removable covers so they hadn't actually had a wash in some time. Now I know how to make the pillow covers with the overlapping gap in the back so you can take them off and wash them easily.

Needless to say this was starting to look messy. Plus when you actually want to sit on the couch you have to move a few pillows around to get settled. Then recently I was browsing through some of my favourite decorating magazines - Canadian House & Home, and Style at Home - and I came across a photo that inspired me. It had a bed covered in neutral linens, I think they were brown and cream or perhaps tan and grey. And at the top were two pillows covered with floral fabric. And I thought it was such a great combination. Florals can be quite busy, but the cushions in the magazine looked so beautiful paired with the neutral linens and the overall look was quite pared down and serene.

I can't remember which issue I saw the picture in now, but I was happy with my own version. I made two plain white cotton cushions, then added the removable covers in the floral fabric. I had found a floral fabric I liked at Fabricland. I used to think (until yesterday I guess) that this kind of fabric was called chintz - but I looked it up and apparently chintz is a coated fabric that has a sheen. This fabric is a linen cotton blend without any sheen. In an effort to do things properly I prewashed the fabric and threw it in the dryer so it could be washed easily later on. I even ironed it. And I sewed the cover with French seams so the fabric won't fray.

And so now we have just two pillows on our couch, and it's quite refreshing. Perfect for summer when it's hot and you don't want any clutter lying around. Ahhh!

Read more...

Lining a knitted bag

>> Saturday, July 15, 2006

I made this bag some time ago from a great pattern I found at Yarn magazine. And by the way, how wonderful is that cover image with the yarn "tea"? I love it! And what a great pattern. For this bag, you knit the bottom panel first, then knit up the sides until it's as tall as you like, then add the tabs for the handles. The bottom part has an extra layer, so that you can sandwich some plastic in between to add structure to the bottom. Also it ends up being sturdier with the two layers. I cut out a rectangle from the lid of a tub of salad greens. I love the yarn they used in the pattern, but ended up using the custom cotton yarn I made in Montréal. Here's a view of the bottom:Anyway, after knitting the bag I put it aside for ages and I finally got around to lining it. And as promised I'm going to explain how I did it. First I measured each side of the bag and added a seam allowance. I cut out a front and back piece, two sides, and a bottom panel. Then I sewed some small pockets to each of the sides. As usual I made two squares sewn together so the pockets don't have any rough edges that might fray.
Then I sewed the front, back and sides together, leaving a gap the size of the seam allowance at the bottom of each seam. That's so when you add the bottom panel on, it doesn't get all puckered. Then I pinned the bottom piece on and sewed that on, sewing each side one at a time. This is what the lining looks like once it's done:The final step was to join the lining to the knitted bag. I usually sew cloth to knitted things with the cloth at the top, so the knitted part doesn't snag against the foot on your sewing machine. And that's it!
Generally a lining is a good idea because sharp things like pencils can poke through knitted bags, so your things are safer with a lining. Also it's an opportunity to add some handy pockets. Here's a view of the finished bag from the side:
And to give a sense of the size:

Incidentally, here's the post with info about the yarn I used for the green bag - I had a new comment recently asking about it.

Read more...

inspired cable knits

>> Thursday, July 13, 2006

Inspired cable knits: 20 creative designs for making sweaters and accessories is a new cable book by Fiona Ellis. I was offered a free copy in exchange for a review by Jen at toronto craft alert and not being one to turn down free crafts books I jumped at the opportunity!

Overall this book is good for an experienced cable knitter and will offer up some fresh patterns. The inspiration for the cable stitches is nature, and the patterns often weave about in a fashion reminiscent of tree roots.
This book would also work well for a knitter who is interested in learning how to cable knit, since the book includes general cable knitting instructions and a glossary of abbreviations. Instructions for each stitch are both written out and presented visually so you can use whichever format is easiest for you.

After trying one of the patterns and getting quite vexed I recommend you have a sheet of paper handy to jot reminders down or it's easy to get lost. The instructions in this book are quite clear, it's just that most cable stitches have lots of details and you have to be careful when you start out. Once you've done a couple of repeats it gets much easier.

The book includes sweater patterns for men and women with one child and one baby sweater (pictured below). It wasn't obvious that the baby sweater was for a baby, until I looked it up in the table of contents. The title at the top of the pattern was only "ripples in time" and it didn't indicate what the pattern was for aside from the accompanying photograph. Each pattern description is more focused on the inspiration for the pattern, with personal stories and suggestions for meditative thoughts while knitting. While the book has mostly sweater patterns (as well as other kinds of tops) there are also some patterns for smaller projects, but not many. There are patterns for a whimsical yoga mat bag that has a cable pattern of a figure doing the tree pose, a wrap, a pillow and this hat and scarf set:
For a fairly experienced knitter it's possible to also use the cable stitch patterns to design your own items. I made the following swatch using the instructions for the cable stitch for the baby sweater pattern. I love this particular stitch, it reminds me of some of the great "onion" designs I've been seeing in stores and elsewhere lately.
Since I don't really want to take on a sweater just now, I'm tempted to use the stitch to make a bag. I was inspired by this gorgeous orange cable knit bag at hide and seek. So I might do mine with the "ripples in time" stitch.

I definitely recommend this book if you are interested in learning cable knitting, particularly if you'd like to make a cable knit sweater, and overall I give it 3 1/2 wools. And yes, I am a complete nerd and I designed and drew this little icon just for my first book review. Thanks for reading it!

Read more...

Even more needle books...

>> Tuesday, July 11, 2006

I am busy sneaking more needle books into my shop...Coming up next - "how to" sewing the lining into a knitted bag, and a review of a new cable knit book called Inspired Cable Knits: 20 Creative Designs for Making Sweaters and Accessories.

Read more...

Bird blossom needle book

>> Sunday, July 09, 2006

(SOLD)

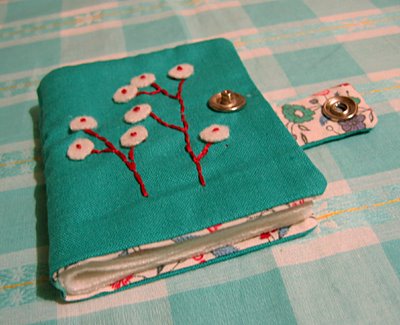
I think this one is my favourite so far. As I've mentioned before it can be hard for me to let the things I've made go sometimes. But nevertheless it's in the shop! I use my shop income to make a bit of a dent in the spending I do on crafts supplies. For example the Amy Butler weekender bag supplies really added up and it will be more than $60 in the end, and that's despite the fact that I'm using some pink fabric I had on hand. Also people have asked me for the needle books, which is really nice. I love to think that people all over the place have them tucked into their sewing boxes and use them when they sew.

This one took a bit longer with the embroidery details. When I'm working on things I develop an association with what I was watching at the time. For this batch of needle books it's actually been the world cup - Bradley is a big fan of soccer and for some reason of all team sports I like this one the best. Which is a nice way of saying that soccer doesn't bore me to tears! It gets more interesting when you start to understand what's going on. But it's almost over, France is playing Italy in the final game. But enough about soccer...while he's watching I'm working away on my needle books!

Read more...

Needle books, Amy Butler, and elephant ribbon

>> Saturday, July 08, 2006

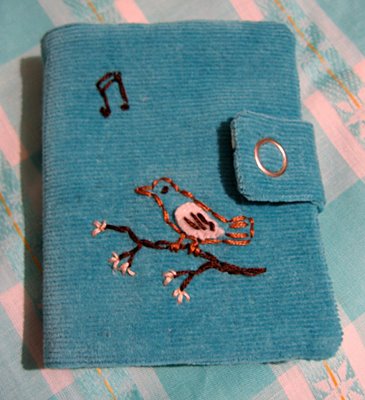
Lately I've been adding more needle books to my shop. A couple of people mentioned that they wanted one of my needle books and missed getting one - which I appreciate! - so I've been making more. I've been picking blue fabrics for this batch but I'll be making some with other colours soon too.(this one is now SOLD)

I'm also excited about making my version of the Amy Butler weekender bag. I was most inspired by this wonderful version. I love bird prints so much and I thought this one was perfect because it's subtle too. I was also inspired by the beautiful contrast with the pink piping.

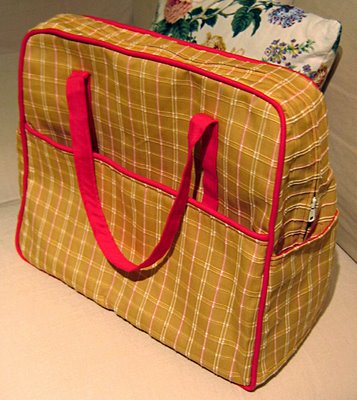
I spent hours looking in fabric shops on Queen West, but ended up choosing a plaid that I had seen in the first place at Fabricland. It has threads of pink in it, and I already had a large piece of dark pink fabric that I thought I could use for the lining and piping. So as you can see I'm using the pink piping idea, and believe me if I'd found that great bird fabric I'd be shamelessly copying the whole design, but I didn't. I like the texture of the plaid and it seems fairly durable too. I also really like it with the dark pink.Whenever I go to Fabricland I appreciate the organization but I imagine that I'll find much more interesting fabrics on Queen St. But when I go to Queen St. so many of the stores are really crowded and it can be hard to even see what's there. It can be a real mish-mash - especially if you're looking for something specific. I didn't find a single bird print! But I am getting a sense of the kinds of fabrics each of the stores have. And best of all I found these adorable ribbons: My favourite is the elephant family, with flower trees. Ahhh! now that was worth the trip.

Read more...

Hannah (wee wonderfuls rabbit)

>> Thursday, July 06, 2006

I suspect I wasn't the only one, but I admit that when Hillary announced that copies of her first pattern book were going into her shop, I was ready and waiting at the computer, refreshing every 2 seconds. As soon as the booklet appeared I nabbed one, and I've been itching to make one of her rabbits ever since.

I did some fabric choosing last night, then got up this morning and did some more arranging of colours etc. The great thing about this project is that you can use up lots of odds and ends - it's a perfect project for "use what you have" because the animals are made up of quite small pieces. I used a vintage apron I've been wanting to use for ages for the dress/body, and other odds and ends for the rest. I was sort of saving the vintage apron for something special. I added an extra layer of white fabric since the apron and blue fabric were a bit thin.
Then while I was debating between being sensible and getting some illustration work done and starting up on the rabbit, something funny happened. I was gazing at the back of the booklet, which has a picture of a clock on it, and then at my clock, and I noticed that it was exactly the same time as the time on the picture of the clock. It was 9:34 am, and as I read on the booklet - "it's time to sew"! Needless to say I decided I would spend my morning on the rabbit. Well it was like a book you can't put down - it's now 3:43 pm and I've just finished sewing Hannah. She was turning out so well I didn't want to stop. I'm quite proud of her so I'm going to show lots of pictures. I hope you don't mind.

I did take a small risk making a rabbit, because as you may recall (but probably don't, why would you?) we already have a very bossy Peter rabbit. He has a tendency to steal things from the fridge and hoard them, to build forts around the apartment with things he "finds" and generally exert a bad influence over the other animals. Luckily the rest of them tend to sleep 90% of time and generally conk out on the couch before making it 3 feet. Which means he has yet to create his own personal army.

But as I worked on my rabbit, I realized that she was quite the little lady and unlikely to cause any trouble around the apartment. And now she's done I'm so happy with her! This is a close-up of her face. I pretty much followed the pattern for everything, looking at the pictures on the cover of Hillary's animals for finishing details and ideas.
This is a close-up of the collar. I added the buttoned bit like the one on the kitty on the cover of the pattern book, but I left the bottom part of the collar unattached and used a running stitch instead of blanket stitch to attach it at the top. I also added a strip of felt round the back for the back of the collar.
Here's a detail of the shoe. I chose the MaryJane version, but I was intrigued by the loafer pattern which I think would also be useful if you wanted to make a Dr. Zoidberg. All the details in the pattern are just so cute.
And finally my own personal touch, a matching tote furnished with mini paint set and book. The miniature book was made by me ages ago during my bookbinding phase. The cover is covered with a pink silk fabric. The paint set was from Science City and they probably still have them.
So all in all I'm delighted with the book, and the rabbit I made, and I really appreciate Hillary sharing her wee wonderfuls pattern with us! If you'd like to see more, be sure to visit the Flickr group.

Read more...

Illustration Friday topic: Sticky

>> Tuesday, July 04, 2006

In a continued effort to get some children's magazine work, I've create another sample spread for Babybug. That's right, I'm going to keep sending them illustrations/manuscripts until they notice me! Hopefully they haven't already noticed me but weren't interested...

It can be strange being an illustrator sometimes, sitting at home wondering what the responses were to your numerous missives. Publishing staff could be looking at samples and liking them, perhaps filing them away until the right project comes along. Or the rejected samples could be sitting somewhere in a big box on their way to recycling! It's a bit like buying a lottery ticket, nothing might happen at all, but you never know when something will get to the right person and lead to a project.

On the upside, I have sent samples and had publishing staff take the time to email and say they liked them. I even had an editor say one of the staff was going to frame one of my postcards and use it to decorate her house. And best of all, I've sent a package that did sit in a file somewhere but led to a book a year later. So even though the online portfolios generally lead to more work, I still keep mailing out packages because you never know.

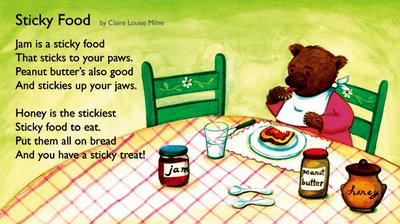
For this illustration I used the Illustration Friday topic (Sticky) as a starting point, and immediately thought of sticky foods - jam, peanut butter, honey. And who loves those more than a young bear? This was my sketch: Generally I like how the final artwork came out, but although my scanner is quite good, in this case it didn't do such a great job. For some reason dark pink doesn't come out well with my scanner. And overall the colours are a lot richer in the original although I did try to adjust them in Photoshop. Oh well! My little bear did come out nice and fat, and I like the decorations on the chair and the scalloped placemat. Here's a detail:As always you can click on the image to see it larger. Thank you for visiting!

Read more...

The long weekend

>> Monday, July 03, 2006

Our long weekend started with some strawberry picking at a farm. I had imagined that we would be there for hours, but it turned out we had filled our buckets in around half an hour! The strawberries are delicious, and we had perfect weather - not too hot and a bit of a breeze. I think we'll go back for the raspberries.
After that we visited Bradley's parents and picked a few baskets of cherries from the tree in their garden.
Then yesterday we took our bicycles on the ferry to the Toronto Islands (Hanlan's point) and rode through the islands to Ward's island. It's much cooler on the island - a huge relief from the 35-degree weather in the city. We had a picnic and lounged around for a couple of hours, we saw lots of robins, I did some sketching with charcoal from the beach and then we headed home.

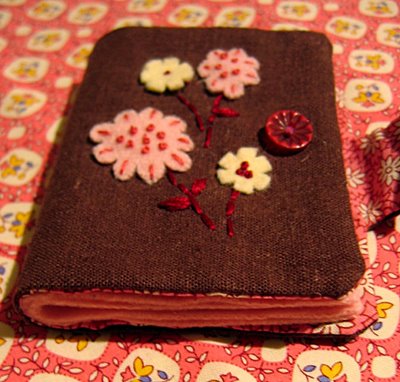
I did a bit of sewing this weekend too, working on a project I will post about next. I also made the decision to let more of my crafts go. I make things and get attached to them. But then they sit around once I've turned my attention to the next project and they aren't getting appreciated (plus they take up room). So with this in mind, I've been sorting out things to put into my etsy shop. Today I added a brown linen needlebook (SOLD) - with more embroidery - and my wool felted white berry pouch.
More to follow soon!

Read more...

  © Blogger template Simple n' Sweet by Ourblogtemplates.com 2009

Back to TOP